
How to enable Email Notifications for the users of your Bubble app
You need to communicate with your lovely customer base - here is how I set it up using Bubble, Canvas templates and SendGrid.

Communication is key and this is especially true for makers of SaaS products with their customer base. This article is about how I have set up email notifications as one of the methods to inform my customers about what is going on within their view of the app.
My product is a chore roster app, and so it concerns teams [household members], their work items [chores], automating allocation [the roster], and a key feature is that the product will take care of the notifications, so that the housemates don’t need to invest the emotional capital chasing up undone chores.
I’m using the Canvas templates from Airdev which has several benefits as listed on their docs site:
Send email from your own domain name
Access to advanced email metrics to measure the success of your email marketing
Send attachments with your emails
Customize the email's design with html directly in your Canvas admin portal
This post is brought to you by DocuPotion

DocuPotion is the PDF plugin Bubble devs love to use. It gives you total control over the design of your PDFs and makes creating beautiful PDFs easy.
Want to create simple invoices? DocuPotion can do that.
Tired of dealing with page breaks that don’t work? DocuPotion has detailed page break controls.
Already using a PDF plugin but can’t run it in the backend? DocuPotion allows you to generate PDFs in backend workflows.
Want to generate a detailed 40-page report with graphs and charts that delights your users? No problem - DocuPotion can generate large PDFs without issue
Prerequisites
A bubble app, based on a recent Canvas template. You’ll want a paid bubble plan, if you plan on using your own domain, which you should.
A domain name [ no problem there, creators love buying domain names ]
An account with Sendgrid, using the free plan [or higher].
An email provider. This sometimes comes with the purchase of your domain name. In my case I used Namecheap, paid the extra for 1 mailbox, which is hosted via privateemail.com . You need at minimum 1 email address which acts as the ‘from’ address, and also the ‘reply-to’ address. I chose the name of support, rather than admin.
Costs
Certain ongoing and one off costs (like bubble hosting and domain purchases) are unavoidable. Regarding the email sending itself, if this is sounding expensive.. fear not, as I am being very conscious to make use of free tiers wherever possible to start with.. so far I am using the free Canvas templates and will be with the free tier of Sendgrid as per https://sendgrid.com/pricing/.
Admittedly 100 free emails per day isn’t huge, but I figure I’ll be sending maybe 2 emails per week per team member, which allows me to get started with about 70 teams. Above this the revenue should easily cover a Sendgrid plan upgrade. I will happily give Sendgrid a ton of money if required due to scale, as this is a symptom my product is doing well. Win Win.
The Docs
Canvas have some great docs, and the email section relating to their templates are at https://canvas.airdev.co/manual, just choose the Emails and Alerts section in the left navigation menu. Have a read through that (seriously, grab a coffee and read through it all), and follow their instructions to generate and setup the API keys you’ll need, which allows your Bubble to call Sendgrid on your apps behalf. Be sure you store these keys in a secure password management system, and date them in case you ever need to replace [roll] the keys. The Canvas docs contain enough info to get this part set up, so I won’t repeat it here.
The Plugin
Usually we need to install plugins to do fancy things, but if you are using Canvas, then this plugin is already installed for you, so just locate it under:
Plugins | Sendgrid for Canvas
in order to add the keys. I only filled out the field labelled:
API Key - dev.
Email Address
Set up your email address as per the canvas docs by running your app as the ‘admin’. i.e navigate to:
Data | App data | locate the runas@admin.com user, and click Run as
Note: The canvas use of Roles is nicely done. If you look at Data | Option sets | Role you will see the two options are ‘App admin’ and ‘Standard’ . You can rename these if you like, and/or change which role a particular user has by editing the Role attribute in the dropdown field for any user. In my case I have extended the roles to also include Team Member and Team Admin, and I use this to manage UI components and Privacy rules within RosterBuddy.app
Anyway.. running as App Admin means you get access to the Canvas Admin portal on the top right

Lots of goodies in there, an in particular if you navigate to the Setup | Settings menu on the left, then select ‘Outgoing email’, then you get the UI mentioned in the Canvas Docs

Add your email that you want your messages to be ‘from’ and ‘replied to’ and click Verify. If all has gone well, then you’ll get a verification email to click on. If not, then the SendGrid docs has some additional pointers here https://sendgrid.com/docs/for-developers/sending-email/sender-identity/
Of the two types of verification, I recommend Domain Authentication rather than Single Sender Verification. You need access to edit dns records within your domain registrar but that is commonly exposed in a web interface you have access to when registering the domain, so this is likely available to you. Just be patient with dns, it can take several hours for data to propagate around the world.
Email Templates
Righto.. several email templates come with Canvas, and these automagically get used for things like user invites, password resets, welcome emails etc. This works based on existing workflows, plus data in the ‘All Email templates’ view under the Data | App data tab. So far so good. What I want to do now, is extend this emailing system, so I can send what I would like, which in my apps case is reminders for people in a household to do their chores.
The UI
As mentioned above, running your canvas app as ‘App admin’ gives you access to the admin views, including ‘Emails’

In this view is a list of the existing Email templates available to you. They are fancy looking [html] and use a a system similar to what Microsoft Word was using in the 1990’s.. i.e the ‘Mail Merge’.
It merges a predefined template with data from the database, by swapping out certain placeholders [variables] in the template, with actual data. cool eh.
We’ll click on Add new template and see what’s next:
This shows a popup like this:

Like any good cooking recipe, make sure you read the whole thing through.
The first section explains how it works:
Configure the content for this email template by updating the fields below. Mail merge terms are dynamic and need to be placed within asterisks (e.g., *FIRSTNAME*).
The next bit says we can’t just do this pop config in isolation, we need to also make changes in the bubble editor:
This action should be accompanied by updates in the Bubble editor. For more information on how to set up new email templates, please read the email section in our canvas documentation.
Also, there is a link to the canvas docs, which we already know about :)
Note: on the canvas docs site, top left there is a dropdown which specifies the version of the docs.. make sure you select the latest version.
In the docs they mention it is simpler to duplicate an existing template, so lets do that instead. Choose the dots on the Welcome Email line and select Duplicate

This shows a popup as below:

Now we have learned that API workflows are involved. So lets click Continue.
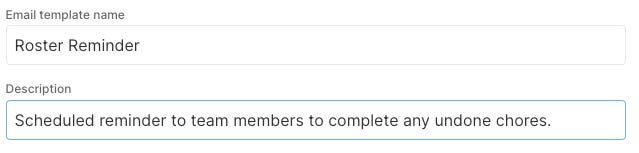
This results in a copy of the Welcome email as expected. It needs a rename which we can do from the right hand dots menu. I’m choosing ‘Roster Reminder’ and while I’m at it, I’ll update the description:
By default this saves it as disabled, so we’ll need to remember to come back here later and enable it.

Ok, jumping back to the docs for a bit https://docs.airdev.co/canvas/v/3.0.0/canvas-functionality/emails-and-alerts#create-update-the-template-content
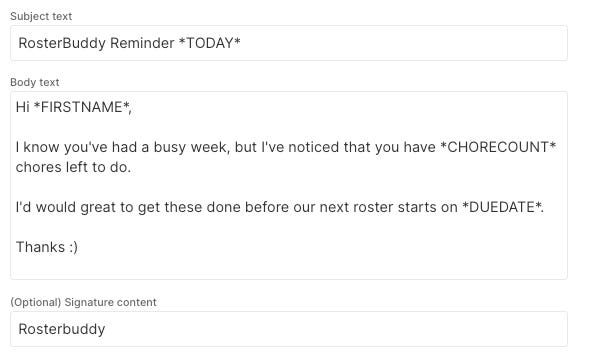
Lets choose some mail merge terms. I’m likely to want the users first name, the app name, some info about the chore status [such as how many outstanding chores they have], and maybe a desired completion date.
Lets go with these items as the mail merge terms, ensuring they have an asterisk at each end

*APPNAME*
*FIRSTNAME*
*CHORECOUNT*
*DUEDATE*
Adding these into the template and pressing enter after each one, produces this result.

Note: If we click Save changes & check the database, we also see them there:

Right, lets work through editing the popup which contains our new template, making it say what we want, then after that we can go and build the mail merge logic in the workflow. I’ve edited the template to look like this:
If you wish, then you can also incorporate html tags into your body content, just have a look at the ‘Sample email content’ template. It seems pretty standard, so creating html in another tool and pasting in there ‘should’ work.
We can work on fine tuning this message later on, based on feedback but for now, it’s good enough. Make sure you Save changes, but we’ll leave the template disabled for now, via its toggle control.
According to the docs we need to ‘Set the ID for the template’ so lets do that next. Off to the database. It seems that the ‘ID’ they are referring to isn’t the ‘Unique ID’, but rather the field called Id_name. Since we copied the Welcome email, the ID_name field is still welcome_email. I’ll update this to ‘roster_reminder’ taking care to preserve their naming scheme, or lowercase, with an underscore.
Note: with all things computers, naming things is important. If you have, or don’t have: spaces, special characters, etc, at least keep it consistent, so that if later on it is a problem, you have a chance of automating a consistent fix across all instances.
Creating a template workflow
We are up up to this section in the docs
This section describes we can use either of Front End, or Backend workflows. I’ll be choosing Backend, as I need the ability to schedule emails, which backend provides a more ‘robust’ support for. In my case I’ll schedule reminders to perhaps go out on day 5 of a 7 week roster.
The setup step for backend workflows will involve:
From the Emails folder in the backend workflows, duplicate the workflow named 'send_email_template' and rename it to match your email template.
So, in your bubble app, navigate to Backend workflows
The docs say ‘from the emails folder’, but this folder doesn’t exist in my app. Lets create it, so we can organise our workflows better. I didn’t notice this until relatively recently, but you can expand the column by clicking the arrow

click Add new folder, name it emails, and click OKAY.
These folders are for visual organisational purposes and won’t affect the functioning of existing or new workflows.
To move a workflow into a folder, open its properties window, then select the desired folder in the ’Workflow folder’ dropdown
OK, back on track. The instructions tell us to:
duplicate the workflow named 'send_email_template' and rename it to match your email template.
We can do a right click copy/pasta on this one:
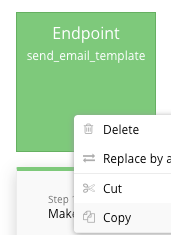
then we rename it to match the email template which we called roster_reminder
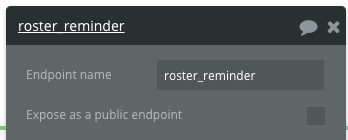
Note: I also recommend unchecking the checkbox labelled ‘Expose as a public endpoint’. We won’t be calling this endpoint from an app outside our bubble app, so it’s good security practice to remove this access, to ‘limit the attach surface’.
So far so good. Lets configure the workflow to be relevant to our new template:
Step 1
We’ll specify our template name as the value in the constraint, so that the correct email template is retrieved in the search
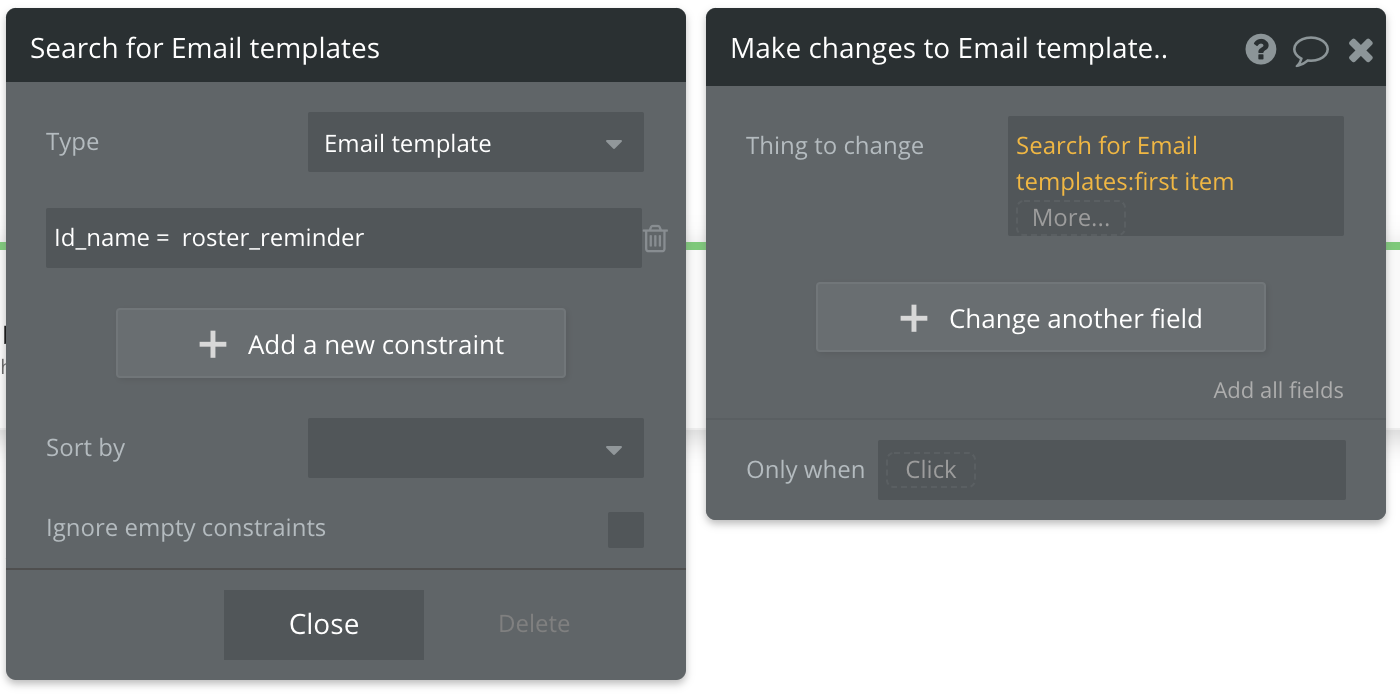
Step 2
No changes required to the action already present of ‘Make changes to Website’. This step is oddly named as we aren’t making changes to a website. I figure it is just a method to retrieve the ‘Website’ config [ which is set up as part of Canvas], so that it can be referred to by subsequent actions.
Want access to more articles like this?
Did you know that some of my posts are published for paid members only? Access all past and future exclusive content by subscribing:
Step 3
Here is where we get to tell the template about how the mail merge terms should be populate by data from our database.
This section is explained pretty well in the canvas docs here under the section ‘Action 3: Send basic email’ so follow that process.
Note that the screenshot in the instructions has a reference to Current Workflows User’s first

However, this wasn’t present in my workflow, but the text of users was

I tracked down this as being the ‘Key’ value which is part of the top level endpoint configuration.

If you click on your new endpoint tile

and view the properties, you’ll see that key value pairs are set up. These are then available for later use in the Actions.
You could rename the Key to anything, then it would appear in the 3rd action as that value.. i.e if Key is “ThisWorkFlowUser” then you could reference ThisWorkflowUser’s email
I’ll just leave it as user for simplicity sake.
The list of Mail Merge items I set up for RosterBuddy as these ones:
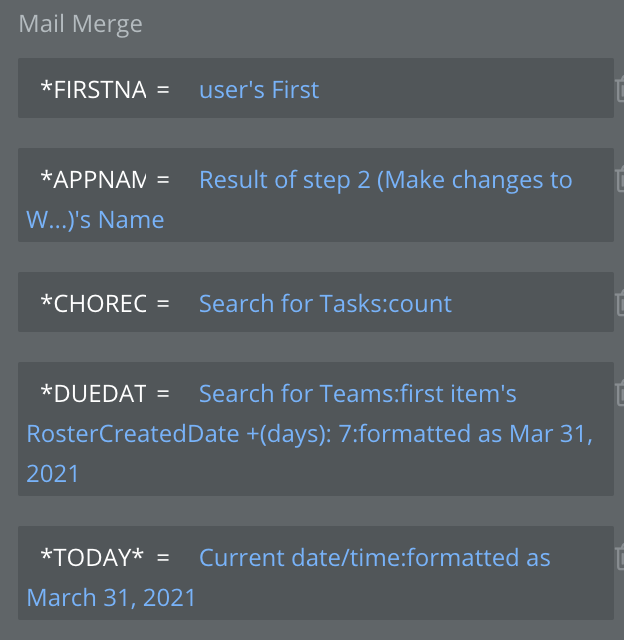
(the field names are longer than displayed)
Basically I want the email to reference the persons name, the app name, the number of chores assigned to them which are still undone [Completed=no], the Due Date [which I’m calculating as the roster generation date + 7 days], and also Todays date. I’ve added the date to the Subject line, to prevent the email client from consolidating them all together [ looking at you gmail].
just fyi, I am getting each persons undone chores using these conditions:
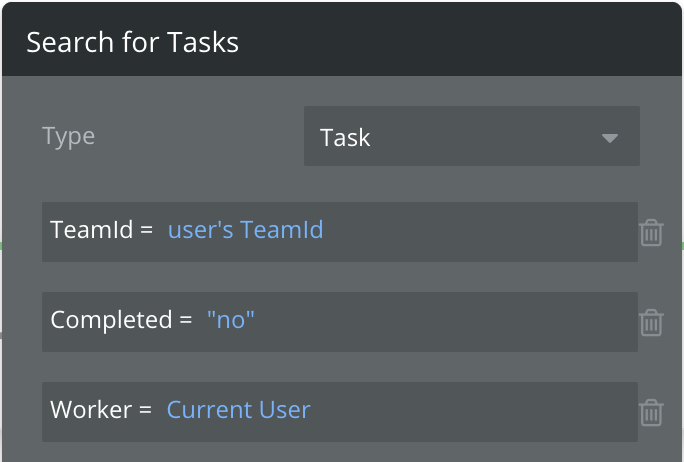
Of course, your app will have different criteria for everything, but hopefully this example shows that you can get any info you need into an email, and have it personalised per user.
One last thing, the ‘Send basic email’ option also have some config for a Button. I’ve configured this to take each user to their own view of the roster [ also supported by some defaults in the UI of the Roster page]

Lets send a test email. The docs list this as a method to manually test
From the backend use the action 'Schedule API Workflow'
So, lets add a button in the front end, that triggers the backend. Ultimately I’ll set up scheduled emails, but for now I just want to see if it works at all.
So, on a page add a Button, label it Send Email, and create a Workflow for it

Add an action to Schedule API Workflow
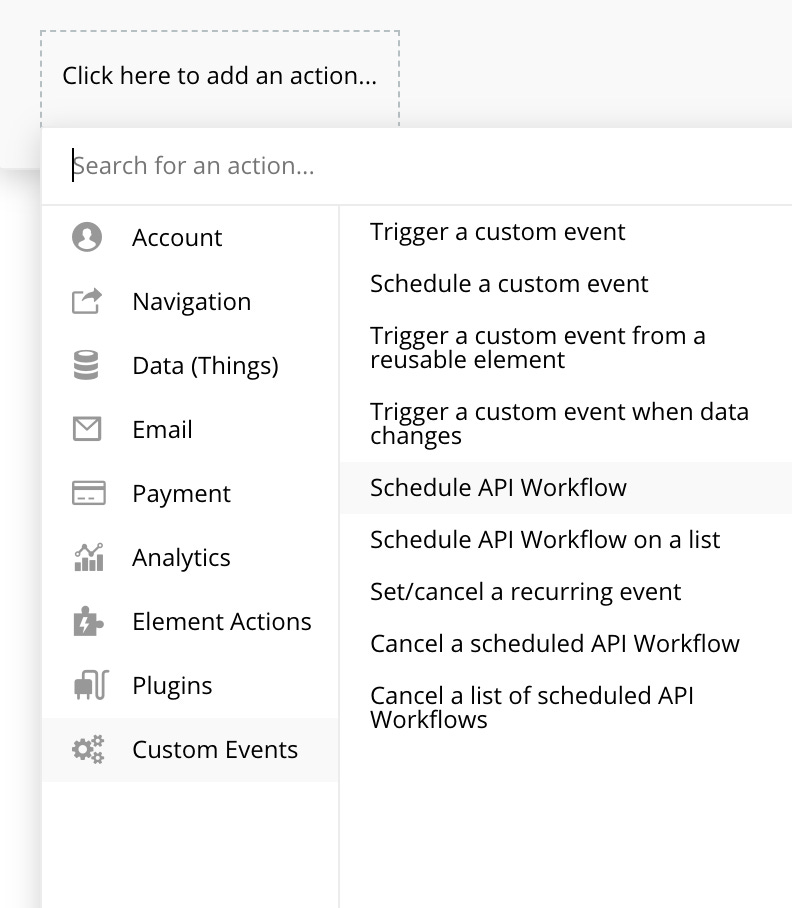
Edit the action to select our new workflow

For Scheduled date, choose Current date/time since we want our test message to go out the door asap

The user can be Current User for now, which will be me as I am the one clicking the button. [Later on I’ll configure this to select all users, then pass a list to the workflow]. Make sure you run your app as a user for which you are monitoring the email mailbox for, so you can confirm the test message arrives.
Now we need to remember to ‘enable’ the email template, as way down at the bottom of the Send Basic Email Action is this condition

..meaning that only enabled templates will work :)
So, run your app as an App Admin
Enable the Template via the toggle

then, run you app as a ‘normal’ user with a known email address, and click the Send Email button
tada…


So that’s it. There are some more steps I’ll take, around automating the scheduling of these emails, and sending a list of users to the backend workflow, but that is fairly straightforward by iterating through a list in the backend. Also I think I’ll add several versions of the body of the message into the database, so that each reminder is slightly different.. not too cheesy, not too annoying. I’ll also need to keep an eye on email traffic, especially regarding the 100 daily limit.
If you found this helpful or know someone who would, please share, and thanks for your time. I appreciate it.
If you want to know more about Bubble and SaaS then follow me on Twitter