How to loop through a list of items using Bubble
Sooner or later, you will want to take the same action on a list of items. Here is how I set this up with Bubble
If you come from a programming background, you’ll be familiar with loops. It is a core piece of functionality from many programming languages, and you often have several types of loops you can process a list with, such as ‘For’, ‘ While’, ‘Do-While’ etc
If you aren’t from a programming background, you’ll soon come across the need to perform some kind of action on a list of items, and you wonder if Bubble can actually do this, as there isn’t some magic ‘loop’ action in the Bubble editor.
Bubble can indeed do this, and I’ll explain how below..
This post is brought to you by DocuPotion
DocuPotion is the PDF plugin Bubble devs love to use. It gives you total control over the design of your PDFs and makes creating beautiful PDFs easy.
Want to create simple invoices? DocuPotion can do that.
Tired of dealing with page breaks that don’t work? DocuPotion has detailed page break controls.
Already using a PDF plugin but can’t run it in the backend? DocuPotion allows you to generate PDFs in backend workflows.
Want to generate a detailed 40-page report with graphs and charts that delights your users? No problem - DocuPotion can generate large PDFs without issue
My Use Case
My App at RosterBuddy.app allocates chores to team members, and does so in a way that balances the workload across the team. Each week the Admin clicks the Create Roster button, and this triggers a workflow which gets the full list of chores from the database, and then will process the list one by one, and allocate the chore to the person who currently has the least ‘work’ allocated to them…, then the next chore is processed until the end of of the chore list is reached.
Each chore being allocated to a person through the processing increments that persons workload counter, so that workload ends up being evenly balanced, and every chore ends up with an allocated ‘worker’.
To implement this I use a backend workflow, which is passed a list of chores. The trick is for the workflow to process one item at a time, then trigger ‘itself’ again, to process the next item, and repeat until done. Keeping track of how far it has got through the list is done by use of an ‘iteration’ counter.
Lets get into it..
Backend Workflow Config
Create a backend workflow and name it according the work you want it to complete.
You won’t need to expose this publicly if you are just using it for business logic within your app.
Backend workflows can accept data, which is referenced by a thing called a Key. You get to name each key whatever you but I recommend keeping it simple.. in my case I just use lower case ‘tasks’ for the data type of Task. Since my list of tasks contains multiple things, I enable the checkbox for ‘Is a list/array’
You’ll need to create a second Key to keep track of which task you are up to, in the processing of the list, or in other words, the 'iteration’. Just call this key ‘iteration’ and it is of type number.
This workflow has the following actions:
Show some UI feedback:
This changes a field in the database for this users team, as a roster generation is part of the team context. I use this to display a rotating cog image to indicate that roster generation is in progress.
Assign the Task:
In this step I need to make a change to this specific task, which is referenced by:
tasks:item #iterationI assign a worker, and I update the date/time record.
For the ‘assigning a worker’ stage, I ensure that my query for the user references the tenancy identifier… really important in a SaaS setup [ more info in my article here].
And, I check that this user is available for work allocation. This setting is user controlled via a toggle, and might be set if the customer is away, or ill etc.
Updating Workload:
Here is make sure that as each task is allocated a worker, that that specific worker ‘workload’ counter is incremented, so that upon the next loop of the workflow, it has an accurate view on who is now the worker with the least workload currently allocated. This is the core of how the workload balancing works. You’ll see this referenced in the screenshot above, which sorts the Users by ‘Workload’ in descending order. magic :)
Increase the counter and Loop:
We now get the backend workflow to ‘call itself’. By this I just mean that after we have done the work form the previous step, we call an API workflow, and that name of the workflow is the same thing we just ran.. i.e ‘manually-regenerate-roster’.
Since we have now processed one item in the list, we need to increment the counter so we know where we are up to, in preparation for the next loop. We do this by adding ‘1’ to the current value of the ‘iteration’ key.
Also, you’ll notice that there is a condition on this workflow, in that we only want it to run, when it has processed the exact number of items in the list.. this is implemented by a condition of:
iteration < tasks:countUpdate the UI:
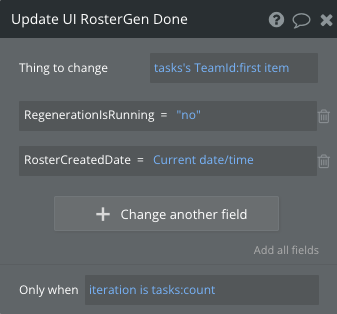
Now that we have done this action to each item in the list, we want to inform the user that their roster workload is now complete, which will be seen by them as the spinning cog disappearing. We implement this by changing the RegenerationIsRunning value for the team to be No. I also update the RosterCreatedDate, which is displayed on the Roster Settings page. That way the Team admin can see how long ago the chorelist was made.
Finding this useful? Most of my articles are free, but not all. If you want the full back catalogue and access to all future paid articles, please consider subscribing.
Phew.. that was the looping bit, showing how a backend workflow can perform some work on a list of items. But where do we get this list of items from.
Read on..
Button Actions
In the user interface I have a button that Team Admins can click, which triggers the new roster generation activity. This performs these actions:
Lets walk through this:
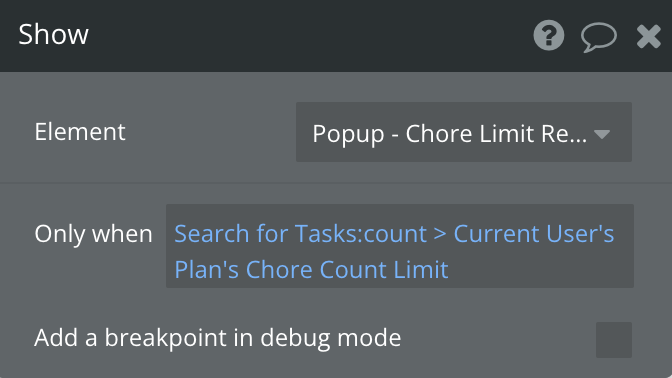
Show Popup - Chore Limit reached
This is not strictly related to looping, but it is where I manage the restriction on functionality for the free plan, and prompt to upgrade.
Reset the task completion status, and assigned worker for the list of tasks
Reset Workload
Here I make each workers workload be reset to zero, in prep for their new roster
Call the backend workflow
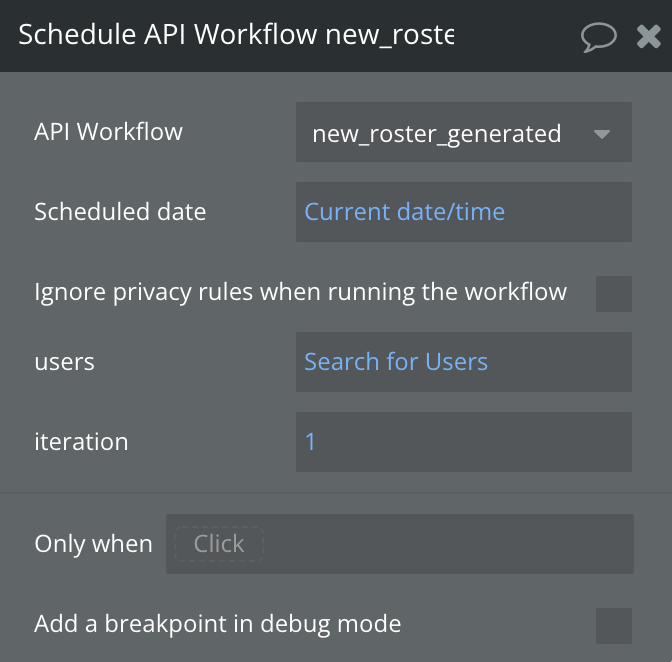
Ok, we got up to the cool bit. You’ll see that on this interface, there are our two keys, ‘tasks’, and ‘iteration’. That’s what I talked us through setting up the backend workflow first, as that config is what defines the options we see here.
So here is where we define what is ‘in the list’ that the backend will then operate on.
We want to get a list of tasks, for this team admin, which is within the tasks limit defined by this team admins plan.
We do this by:
Search for Tasks(TeamId = Current User’s TeamId):items until #Current User’s Plan’s Chore Count LimitAnd you’ll note that we set the iteration to be 1, which means we are starting at the beginning of the list.
(And I like that Bubble has its arrays starting at 1 and not 0, which is the bane of some programming languages)
I have a few other actions here which trigger different backend workflows to.. send an email to the team members that a new roster is generated, and set a reminder for a future date to send an email for any chores not completed, and increment some public metrics.
So that’s it. You can easily set up something similar and loop through lists of items, and end up with some really complex and useful business logic :)
Thanks for reading,
..Marty


