How to process shopping cart payments with multiple sellers (Stripe Connect)
Giving your users a shopping cart style experience
If you’re building a marketplace with Bubble, you’re likely using Stripe Connect to process payments. Some marketplace payment flows are pretty straightforward to implement. For example, if you’re building an accommodation rental marketplace like Airbnb, you may have a payment flow where:
The customer pays for the accommodation immediately
The payment gets split between the host and your marketplace (likely using a destination charge)
Note: you can have more complex versions of this payment flow where there is a delay between when the payment is made and when the seller receives the payment - see this post for full details.
Things get more complicated when you’re running a marketplace like Amazon, where customers can add multiple items from different sellers to their shopping cart. You’ll still want to split the payment associated with each item in the shopping cart between the seller and your platform, but also allow the customer to pay for all the items at once. Cranford Tech has been running the Stripe Connect - Marketplace plugin for the past 2 years and we’ve received quite a few enquiries about this type of payment flow over this time.
You can implement this into your Bubble app using Stripe’s ‘Separate Charges and Transfers’ method. The rest of this post will go through the steps involved in setting up this type of payment flow….. or if you prefer you can watch the video version :
Important note: This approach will only work if your marketplace/platform falls into one of these two categories:
Your platform and all the sellers on your platform are registered in the same country (different European countries in the euro area are also ok)
Your platform is registered in the US and the sellers on your platform are registered in a country where Stripe supports cross-border payouts
This unfortunately means that there is currently (to our knowledge) no good solution for non-US based platforms who operate a global marketplace with sellers in different countries.
Overview of steps involved
Structure your database for shopping cart-style payments
Allow your sellers (also known as ‘merchants’) to register for a Stripe Express account and add products
Create a Stripe Checkout Session with multiple items to allow customers to pay for multiple items at once
Save down details to your database for the transaction as a whole and ALSO for each individual item in the customer’s shopping cart
Make transfers to each of the relevant sellers
Link each transfer to a specific transaction
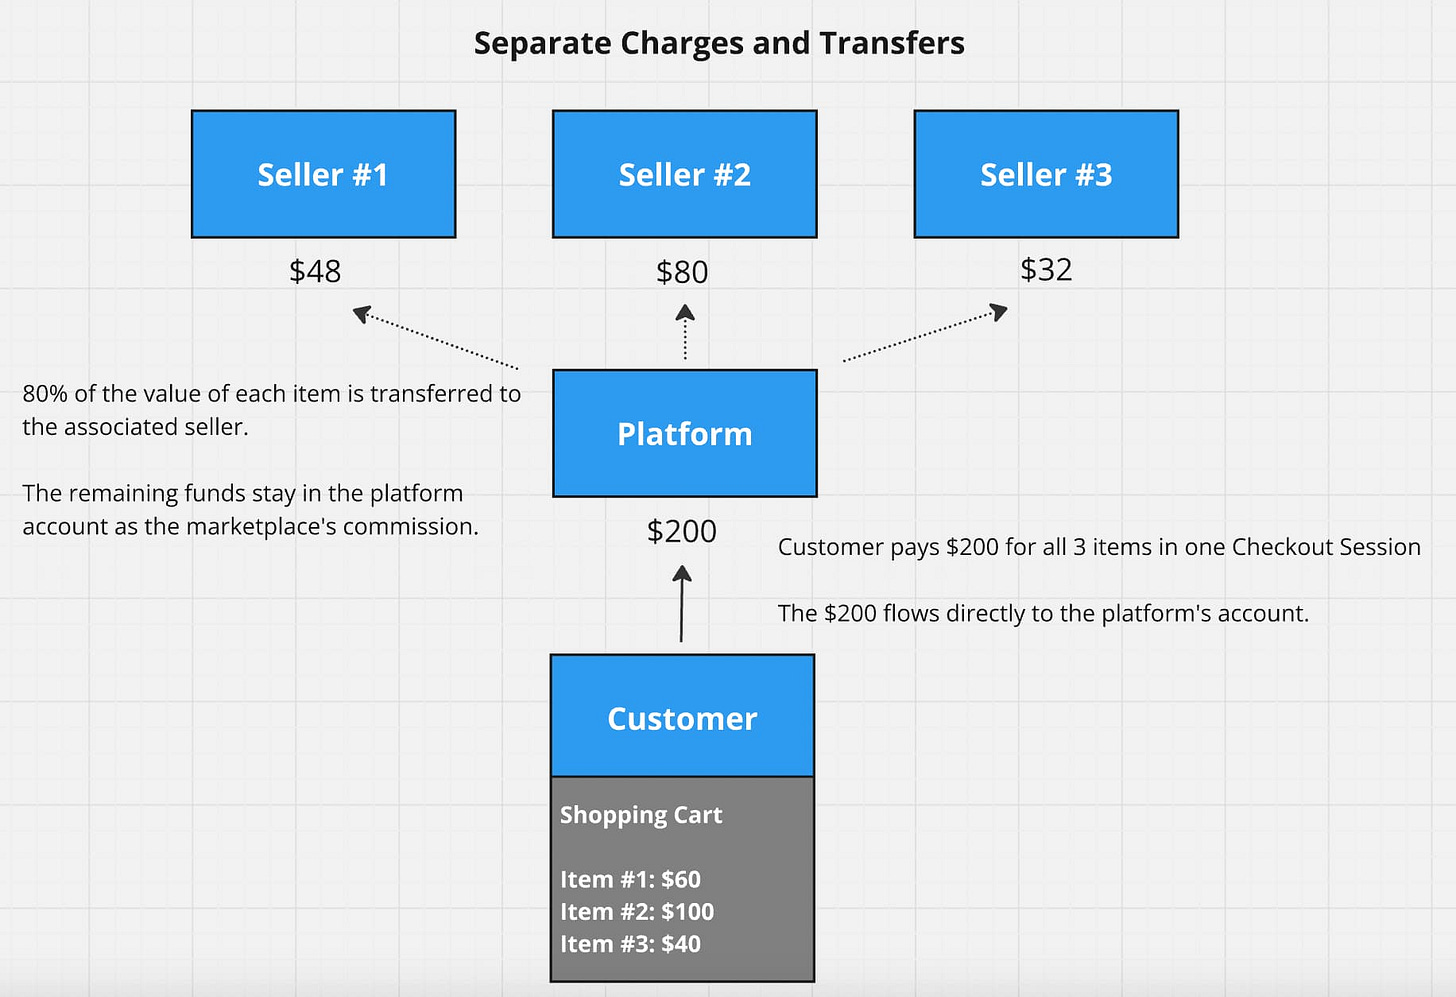
Visually, this is how the payment flow looks:
We’ve put together a demo app, which you can view here (editor is public), so you can check it out if you’re looking for an actual example of how to implement this payment flow.
This post is brought to you by PDF Potion
PDF Potion is the PDF plugin Bubble devs love to use. It gives you total control over the design of your PDFs and makes creating beautiful PDFs easy.
Want to create simple invoices? PDF Potion can do that.
Tired of dealing with page breaks that don’t work? PDF Potion has detailed page break controls.
Already using a PDF plugin but can’t run it in the backend? PDF Potion allows you to generate PDFs in backend workflows.
Want to generate a detailed 40-page report with graphs and charts that delights your users? No problem - PDF Potion can generate large PDFs without issue.
Step #1: Structure your database for shopping cart-style payments
There are a number of ways you can do this, but I would suggest having the following data types:
You can view the database section of the demo app if you want to see this in Bubble.
Some key things to note:
Each user has their own ‘Shopping Cart’, which is essentially a list of ‘Cart Items’ (which are in turn based on the products themselves). This is going to make life a lot easier in step 3 when you’re creating a Stripe Checkout Session with multiple items.
Each payment will have an associated ‘Transaction’ (which is the overall payment) and a list of ‘Item Purchases’. The list of item purchases is really important in allowing us to transfer the appropriate amounts to individual sellers in steps 5 and 6.
Step #2: Allow your sellers (or ‘merchants’) to register for a Stripe Express account and add products
You’ll need to onboard your sellers so that they have their own Stripe Express account and then let them add products to your marketplace.
You can learn how to do this (with the Stripe Connect - Marketplace plugin) in the below tutorial:
Step #3: Create a Stripe Checkout Session with multiple items to allow customers to pay for multiple items at once
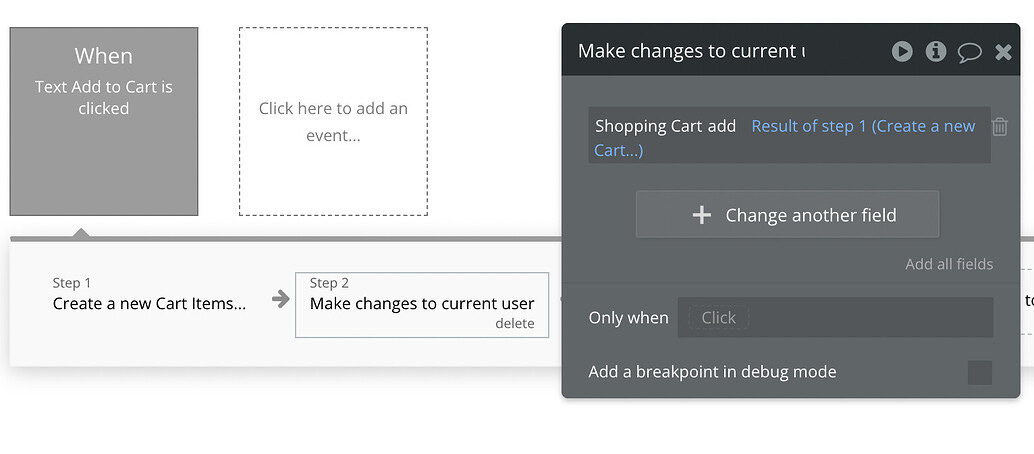
This is where your database structure will either make things pretty straightforward or very difficult. I recommend following a structure similar to what is outlined in Step #1 above and creating a new cart item each time a customer clicks ‘Add to Cart’ on a particular item:
You can then add this cart item to the ‘Current User’s Shopping Cart’:
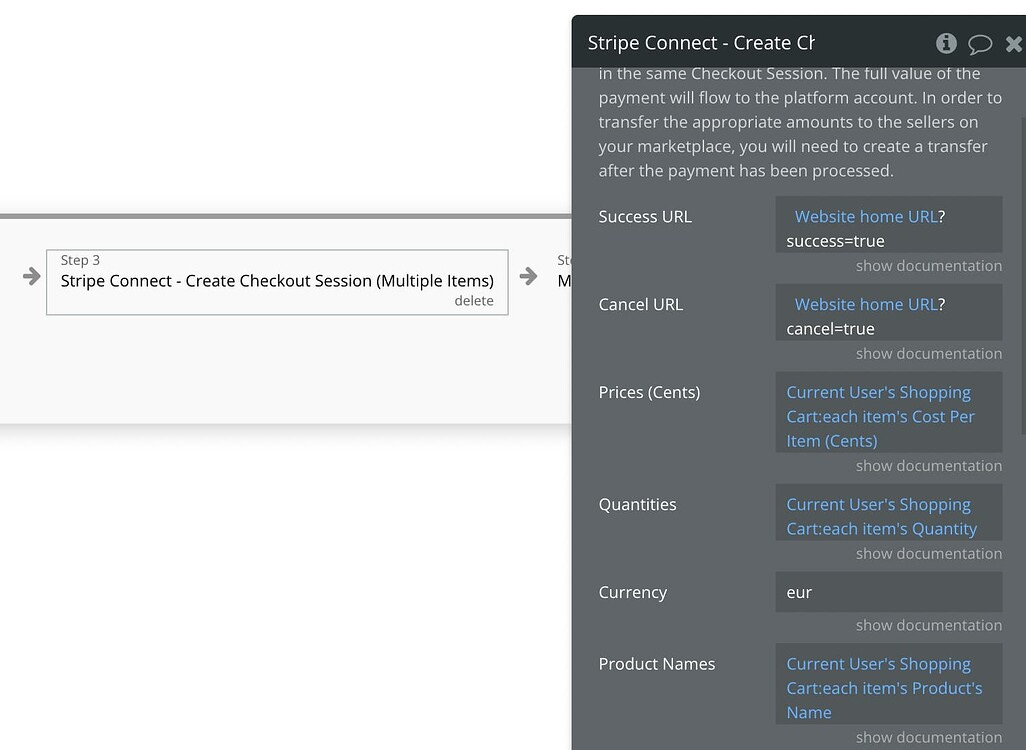
Now when you’re creating your Stripe Checkout Session, you should be able to easily access a list of cart items. In the below example, I’m using the ‘Stripe Connect - Create Checkout Session (Multiple Items)’ action that comes with the Stripe Connect - Marketplace plugin to create the Checkout Session:
These are the fields used in the ‘Stripe Connect - Create Checkout Session (Multiple Items)’ action:
Note that there’s no reference to the seller of each of the underlying items in this action. We will need to record this information in order to determine how much to transfer to each seller - see the next step for full details.
Step #4: Save down details to your database for the transaction as a whole and also for each individual item in the customer’s shopping cart
As highlighted in step #1, I recommend using the following two data types to record details of a payment:
Transaction
Item Purchase
‘Transaction’ is intended to record details of the transaction as a whole, while ‘Item Purchase’ is intended to be used for individual item details.
As shown in the below screenshot, I typically create a new ‘Transaction’ when the user clicks ‘Checkout’ and then save down the Checkout Session ID to this new ‘Transaction’ after the Checkout Session has been created:
It’s a bit more difficult to create records associated with each individual item as there will likely be an uncertain number of items in the customer’s shopping cart. There are a number of ways to approach this, but what I would suggest is:
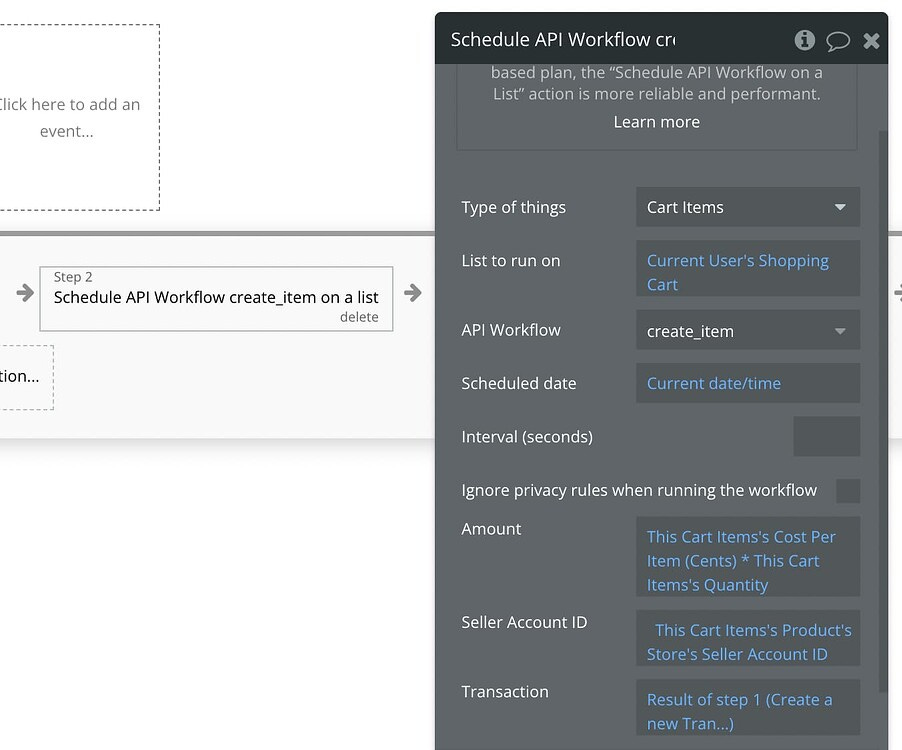
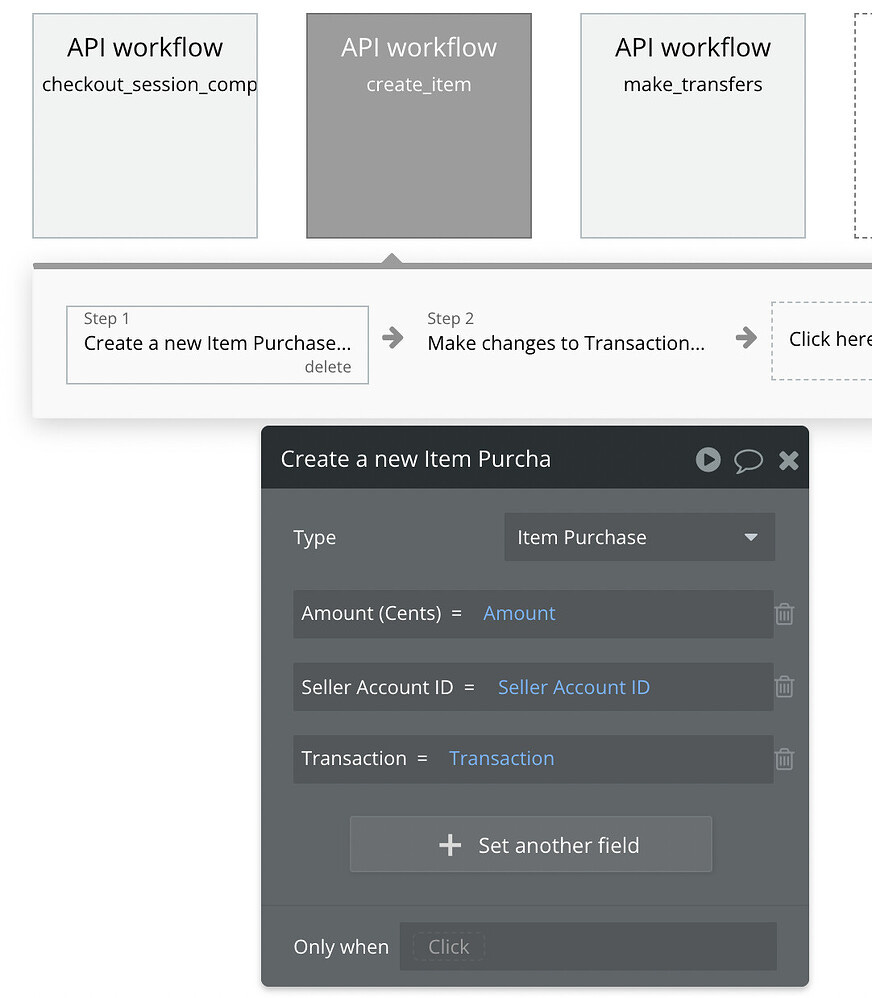
Add a backend workflow that creates a new ‘Item Purchase’ for each ‘Cart Item’ that’s passed through to it
Run this workflow on the list of ‘Cart Items’ that are in the customer’s shopping cart
Note that I’m passing through the ‘Amount’ of the item purchase, the ‘Seller Account ID’ and the ‘Transaction’ to the backend workflow. This is really important for being able to transfer the correct amount to the seller’s when the Checkout Session has been completed.
Save down this data to the ‘Item Purchase’ in the backend workflow (and add each one to the appropriate transaction):
You should end up with something like this, where you have 3 different ‘Item Purchases’ associated with the same transaction, but with a different Seller Account ID:
Step #5: Make transfers to each of the relevant sellers
At this stage, when customers make a payment, the full value of the payment should be ending up in your platform’s Stripe account. However, your marketplace is only supposed to take a % commission of each transaction. Therefore, we need to transfer the appropriate amount to each seller after the payment has been made by the customer.
For the rest of this example, I’m going to assume we’re transferring 80% of the value of each item purchase to the seller, with the marketplace retaining a 20% commission (less Stripe fees).
I recommend using a Stripe Webhook to trigger a backend workflow whenever a Stripe Checkout Session is completed (you’ll want to use the ‘checkout.session.completed’ event). You can use this backend workflow to save down the PaymentIntent associated with the transaction. This will be crucial for step 6.
We’re then going to create another backend API workflow that will actually make the transfers. In the demo app (editor link is here), I’ve called this workflow ‘make_transfers’ and passed through 3 parameters to it: 1) Seller Account ID 2) Amount and 3) Charge ID:
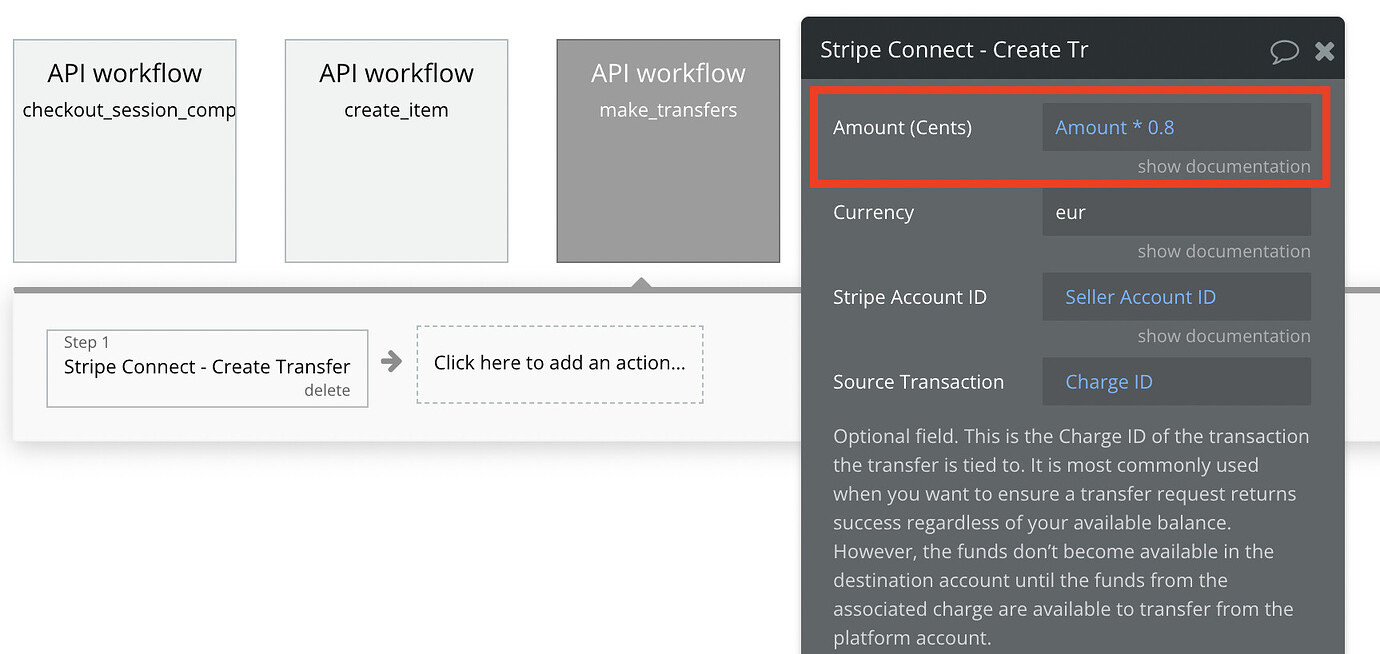
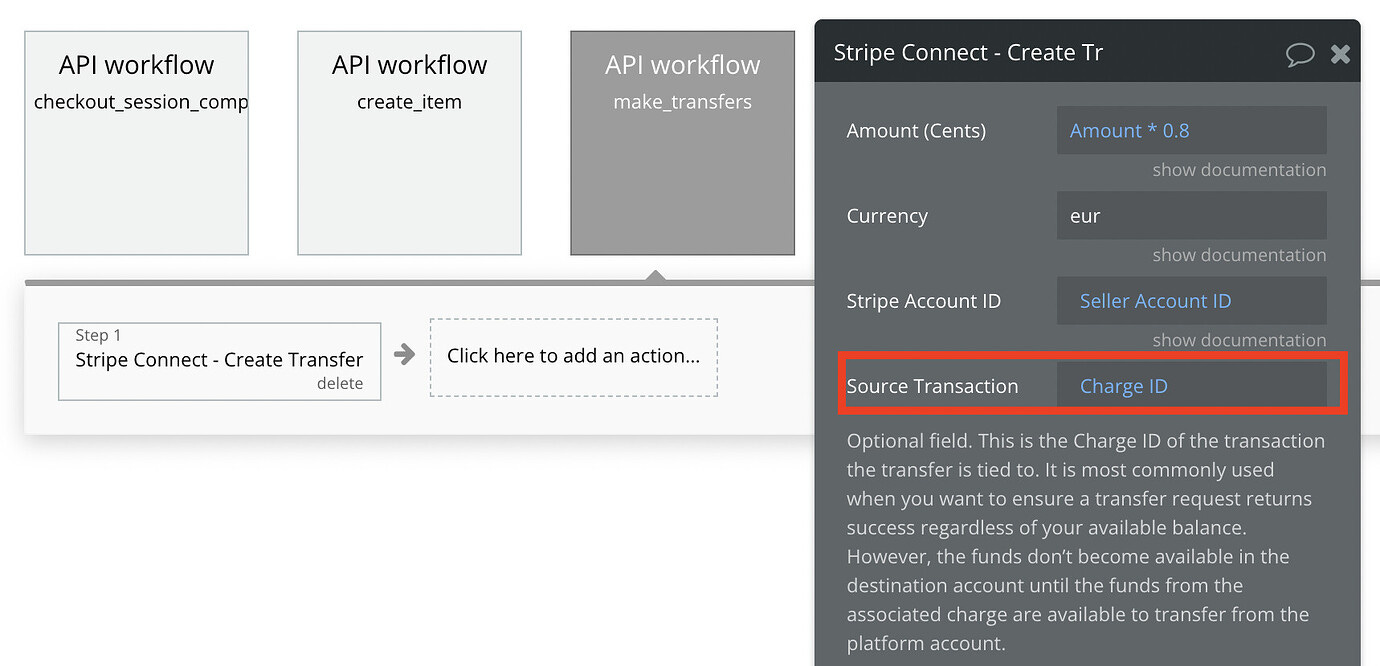
I’m then using the ‘Stripe Connect - Make a Transfer’ action that comes with the Stripe Connect - Marketplace plugin to make the transfer to the relevant seller:
You’ll see I’m transferring 80% of the total amount. This is because the marketplace is taking 20% as a commission.
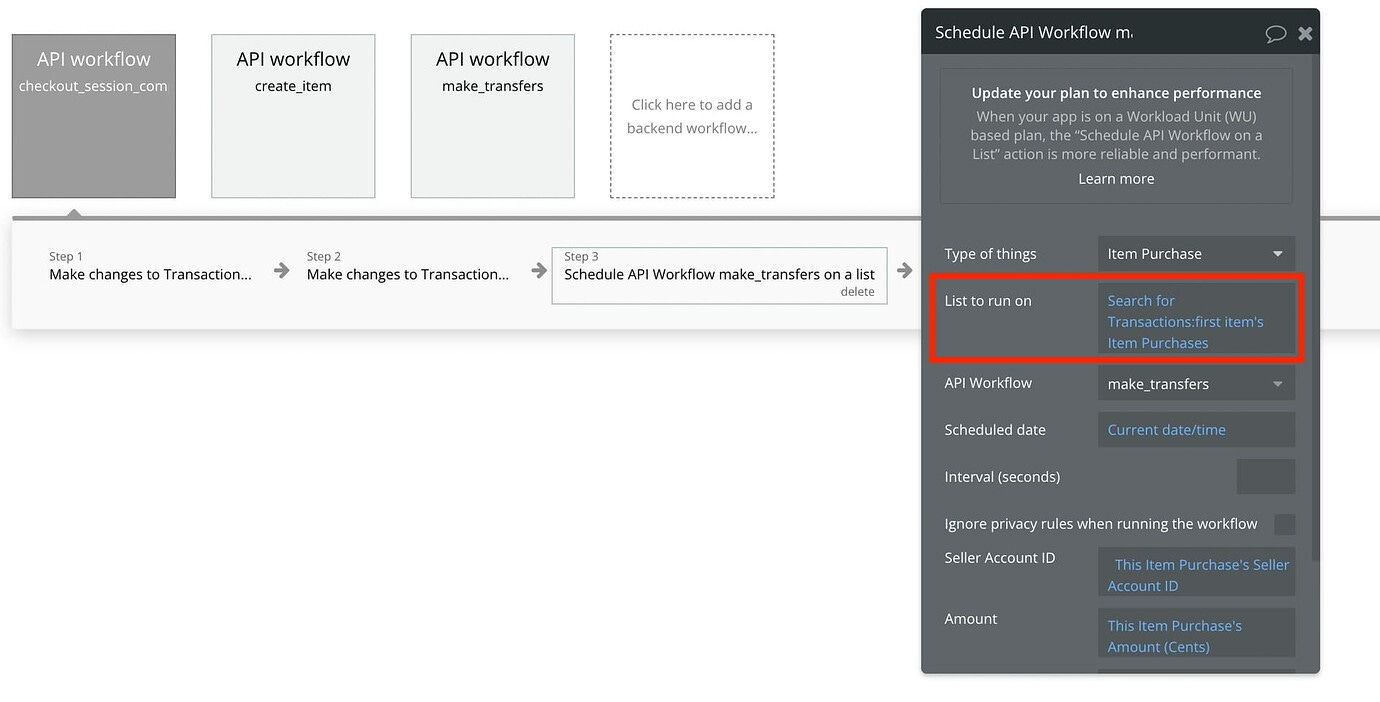
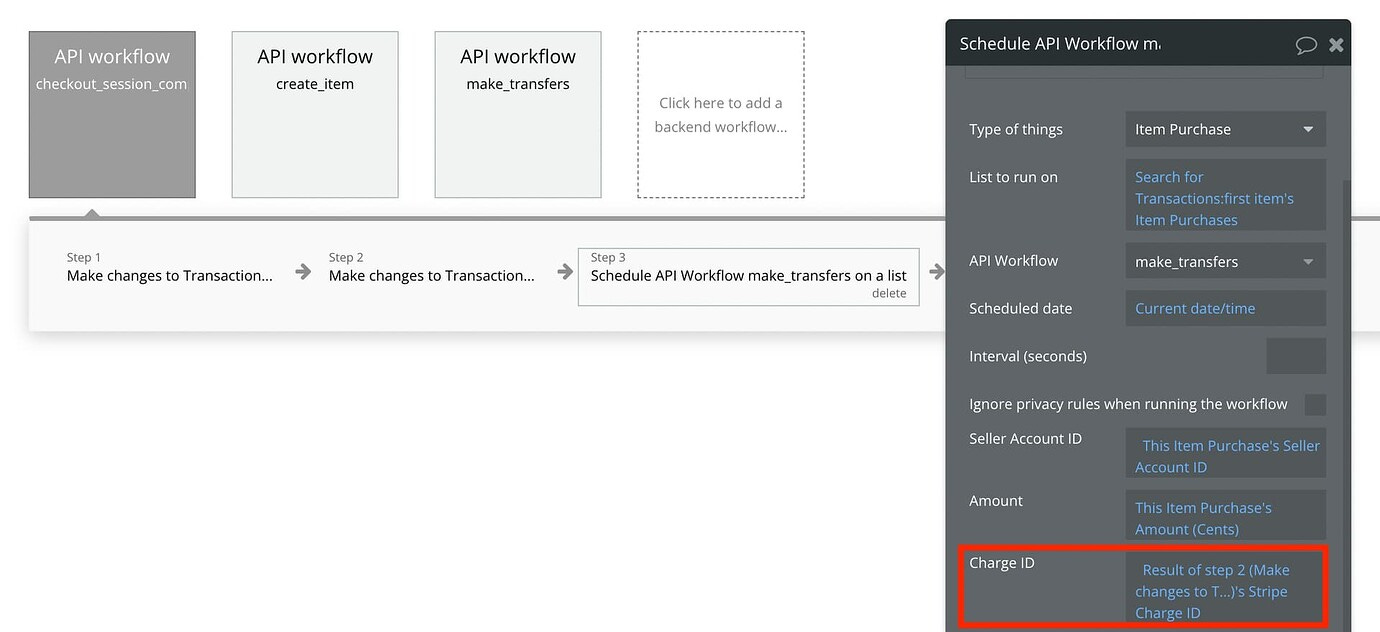
Of course, we need to actually trigger this ‘make_transfers’ backend workflow. I suggest triggering it in the workflow that’s being triggered by the Stripe Webhook (so you’re effectively using one API workflow to trigger another API workflow).
We’re going to schedule this API workflow to run on the list of ‘Item Purchases’ associated with the transaction that has triggered the Stripe Webhook:
You can use the Checkout Session ID that is sent via the Stripe Webhook to find the relevant transaction in your database:
Step #6: Link each transfer to a specific transaction
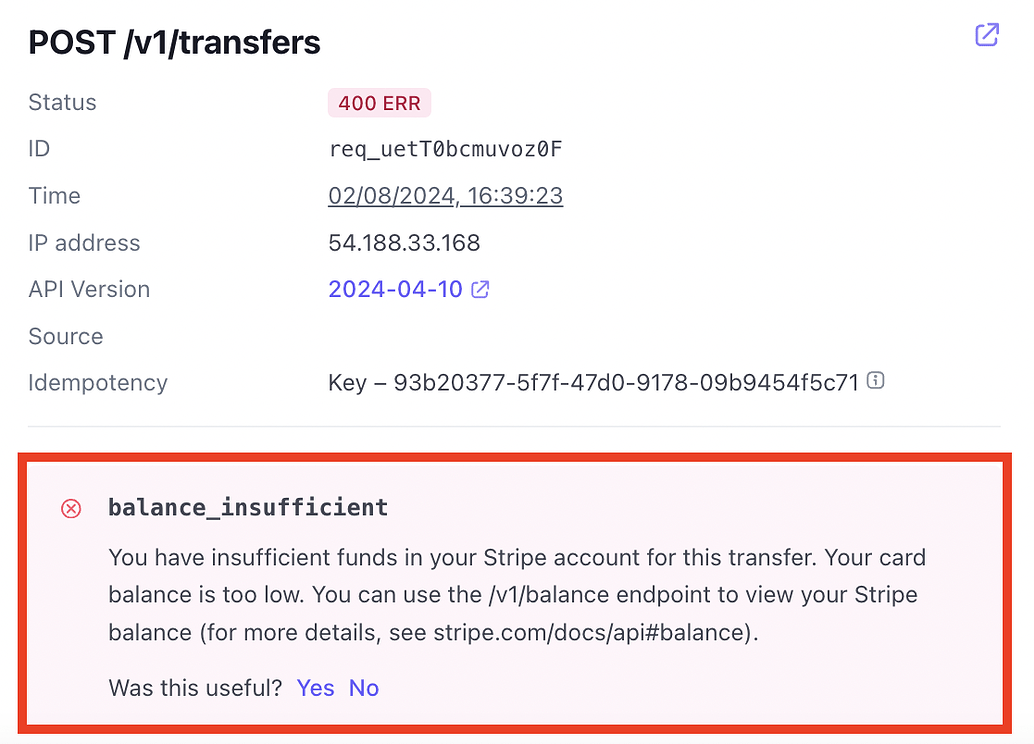
You should now be able to automatically make transfers to each of the sellers when a user pays for their shopping cart items via a Stripe Checkout Session. However, you may sometimes run into an issue where Stripe fails to make the transfer and returns the following error:
This seems strange. After all, your customer has literally just made a payment that should have been more than the total amount you are transferring to all of the sellers. However, Stripe doesn’t necessarily make all of these funds available to be transferred (or paid out) to your sellers. These funds are ‘pending’ rather than ‘available’.
Fortunately, there is a solution to this. As outlined in the Stripe documentation, we can tie a transfer to an existing charge by specifying the charge ID as the source_transaction parameter.
This means the transfer will always go through successfully, even though the funds don’t become available in the destination account until the funds from the associated charge are available to transfer from the platform account.
We can implement this in the backend workflows of our Bubble app by:
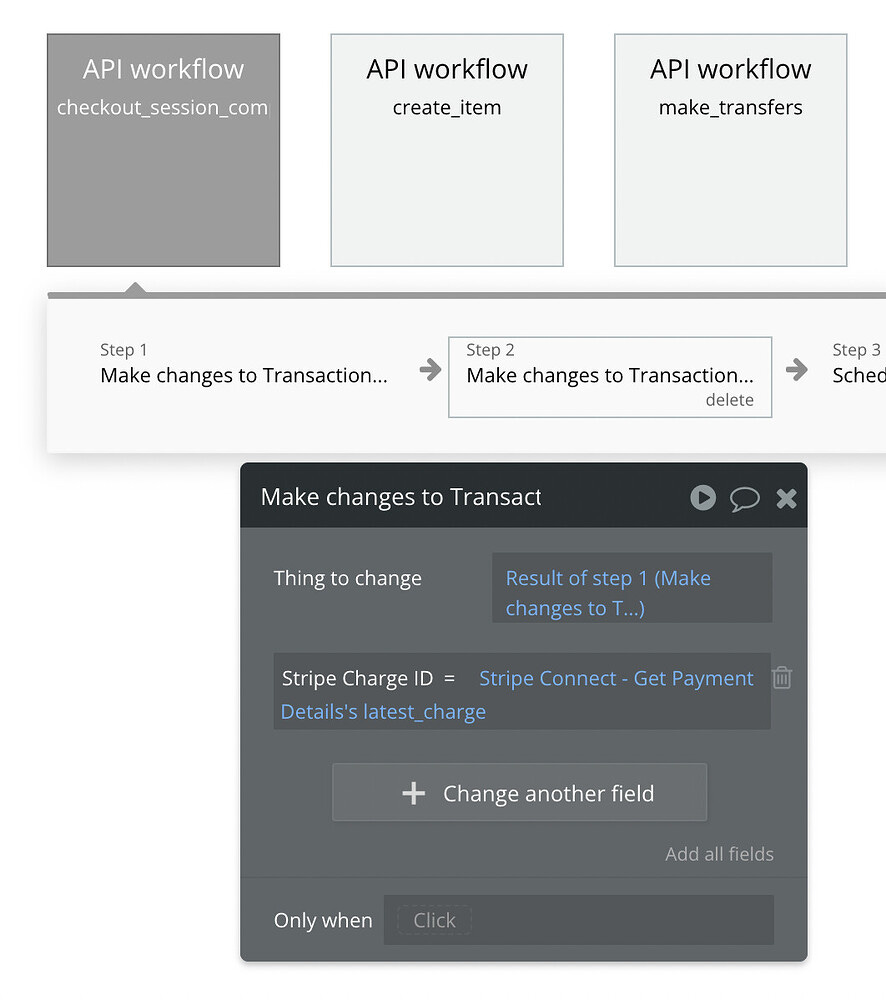
Saving down the Charge ID associated with each transaction (I’m using the ‘Get Payment Details’ call that comes with the Stripe Connect - Marketplace plugin in this example)
Passing this Charge ID through to our ‘make_transfers’ backend workflow
Using this Charge ID to specify the source transaction when making the transfers
Disclaimer
Absolutely none of this should be taken as the absolute source of truth when it comes to implementing a shopping cart-style payment flow for a marketplace with Stripe Connect. There are doubtless a number of ways to building this type of functionality. What we’ve described is simply the best solution we’ve come across after spending quite a bit of time digging into the issue


