How to receive recurring subscription payments for your SaaS Bubble app using Stripe
A walkthrough of the steps you need to complete to actually get paid for your hard work
The Problem
Many solo founders of SaaS apps have spent hundreds of hours building the solution to a problem before they release it to their customers. Without a method to receive regular payments from your customers, your app is more of a hobby than a viable business, so payment processing is critical to your plan.
The trouble is that processing payments is complicated, requires a high degree of trust, and the MVP for the security controls need to be at 100%. In addition there are many regulations regarding the collection and storage of credit card details which if you get wrong, could result in financial and/or criminal proceedings against you.
For these reasons any wise solo founder will use existing services for the management of payment information so you can relieve yourself of all of these burdens, and focus on the business value that your app provides. Let Stripe worry about PCI DSS, and instead spend your time on feature development.
If you have the funds then using a plugin like billflow.io looks good, but if you need to keep running costs low then building it yourself is possible.
It is common to stumble across snippets of information on twitter about implementing payment processing but harder to locate one article explaining the process end to end. This article collates some of these snippets in once place, and explains how I joined them up to get a working system. In particular it concerns the NoCode platform Bubble.io, and the payment platform Stripe.com. The steps relate to how I set this up for my Chore Roster Automation tool for households at RosterBuddy.app.
Let’s get started…
This post is brought to you by DocuPotion
DocuPotion is the PDF plugin Bubble devs love to use. It gives you total control over the design of your PDFs and makes creating beautiful PDFs easy.
Want to create simple invoices? DocuPotion can do that.
Tired of dealing with page breaks that don’t work? DocuPotion has detailed page break controls.
Already using a PDF plugin but can’t run it in the backend? DocuPotion allows you to generate PDFs in backend workflows.
Want to generate a detailed 40-page report with graphs and charts that delights your users? No problem - DocuPotion can generate large PDFs without issue
Assumptions
You are on at least the personal plan with Bubble, as the payments processes will require backend workflows
Note: if you haven’t yet signed up with Bubble, you can do so via this link here and Bubble will credit you with $15 as part of their referral program.
You are building an app, which supports multiple customers, and access is based on a subscription model
You want to allow your customers start a recurring subscription so you can receive repeat payments for this using Stripe
Some Terms
Customer: An entry in your Stripe account representing each of your subscribed customers. Has a Customer ID (starts with cus_)
Plan : A concept within your Bubble app, representing a collection of features. You may have multiple plans.
Plugin : bolt-on functionality you can add to Bubble. Some are free, some paid.
Product: A concept within Stripe, representing what your business offers.. in your case, a recurring Subscription to your Plan. A product has attributes such as Name, Price, Frequency etc. It has a Product ID (starts with prod_, and its Price identifier starts with price_)
SCA : Strong Customer Authentication readiness. A rule in effect as of September 14, 2019, as part of PSD2 regulation in Europe, requires changes to how your European customers authenticate online payments.
Subscription: A Subscription represents a specific connection between a Customer and a Product. Has a Subscription ID (starts with sub_)
User : An entry in your bubble database representing each of the customers that have signed up to your app.
Webhook : A way for an app to provide other applications with real-time information. (also called a web callback or HTTP push API) . Stripe will ‘push’ status information back to our Bubble app via a Webhook. Bubble will listen for this via a Backend WorkflowApi Endpoint.
In Summary: A Customer has a Subscription to a Product which has a Price.
More info in the Stripe Glossary and the Bubble Glossary
Let’s add some plugins..
Adding the Stripe Plugins
Install the Stripe plugin and the Stripe Customer Portal plugin to your app in Bubble via Plugins | Add Plugins | Stripe | Install | Done
The Stripe plugin is for the payment processing. The Stripe Customer Portal plugin makes it easier for customers to manage an existing Subscription, for activities like cancelling, renewing and changing their payment method.
Configuring the Stripe Plugin
The API keys within your Stripe account are needed within your Bubble app, to allow actions in your app to reach out over the internet the Stripe services, and authenticate in order to take actions there. Being able to test credit card transactions separately from production is important so you’ll see both Live and Development keys. Make sure your pay attention to which field you are pasting them into.
The steps for copying these from Stripe to Bubble are in this video from 2:30 to 5:14. Thanks to Evan Little.
A note about production API keys. With many vendors that generate API Secret keys in your account, they will only show you the value of the key once in their UI. One Time Only. Make sure that you store the value for this key in an appropriate password management system that you protect well. Also ensure you name that record with the date it was created, as over time you may revoke/renew keys and you want to be sure which is which. Make sure your NEVER publish the actual values of your keys, especially the Live ones. They might be called ‘keys’ but they are functionally the same as passwords.
When you are done the Stripe keys config will look similar to this:
Further down the plugin page there is a section called Stripe Checkout version. Although the default is ‘Checkout v2(allows saved cards), we we going to select ‘Checkout v3(SCA-compliant)’.
The SCA standard was in effect for European customers since 2019, and since you are running a global multi tenanted SaaS app, I’m assuming you don’t want to exclude 30 Countries that are part of the EEA.
Configuring the Stripe Customer Portal Plugin
The process is similar to the Stripe plugin, however for the ‘API Key’ and the ‘API Key - dev.’ values require the word Bearer and a space, before you paste in your key values. The word Bearer is required for technical reasons, as part of the OAuth 2.0 specification. More info here, but just know for now that if you type the word Bearer then a space then your key, it will work. I’ve redacted my actual key values below :)
You’ll also be including the urls of your Bubble app that the customer should be referred back to by Stripe once they have done the processing, such as subscribing a customer to a product. Those pages you refer to will take some action, like displaying a message that says ‘Subscribed’, or listing the Subscription Expiry date.. more on that later.
Bubble Database Setup
Plans
You may want multiple Plans, i.e Free, Team, Enterprise etc. You’ll need to store these either as Options, or in your Database. Since these plans may have other attributes I recommend adding a Datatype called Plans, and storing them there. Fields like below should be sufficient. Even if you only have one Plan for now, it is good practice to think ahead to possibly needing multiple plans in the future, as it is easier to set this up now, than change it later.
DataType:
Plan
Fields:
Name [text]
Description [text]
Frequency [text]
Price [number]
Stripe Price ID [text]
Add at least one plan via Data | App data | All Plans
Don’t worry about the value for Stripe Price ID, this will get created when we add a Product in the Stripe console, and we’ll copy it to Bubble later in this article.
Users
You’ll need a method to keep track of which users are subscribed, to which plan, and what their current payment status is. This will be be persisted in your Bubble database, as attributes of your User datatype. This information can then be used to control access to various functionality and data within your app.. i.e.. the Value you are providing in exchange for your customers investment of $.
Bubble already provides the User datatype, so you’ll just need to extend it by added these Fields.
Plan [Plan]
Last Payment Made [date]
Subscription End [date]
Stripe Subscription ID [text]
Stripe Subscription Status [text]
Stripe Cancel at End [text] , default = no
A Note about the Plan field. Since you created the Plan datatype in the previous step, you can refer to it here, as the ‘Field type’
Creating your Stripe Account
You’ll need to sign up at Stripe.com. You’ll be guided through a wizard collecting information about you and/or your business. A video walkthrough of this step is here from 0:00 up to 2:29. Thanks to Evan Little.
Configuring your Stripe Account
Now we need to add some ‘Products’ to Stripe. Since we are talking about subscriptions to your SaaS service, then we can think of Product as a Subscription to one of your Plans.
Login to your Stripe account, select Products on the left menu, and click the Add Product button.
You can now define your Products Name, Description, Pricing & Frequency.
Just complete the two main sections, here is my example below
Product Information
The Name of the Product can be anything, but it makes sense to match it with the name of the Plan in your Bubble database, to avoid any confusion during the subscription process.
Pricing
Here we are setting the Price, Currently, Recurrence and Frequency.
Click Save Product
You now have a Product :) and will be redirected to the page for this particular product in the Stripe dashboard.
On this page, scroll down to the Pricing section, and make a note of the API ID that starts with the text:
price_
Copy this to the Stripe Price ID field for the Plan in your Bubble database that matches this Product. We’ll use this field when we trigger the Stripe plugin to subscribe a user.
Subscribing
A user in your app needs to take an action to ‘Subscribe’ to your new recurring payment system. You’ll be setting up a page which has a button which triggers this process. Here is how I’ve done this for RosterBuddy.
I use the Canvas templates from Airdev and this comes with an Account page. I’ve made the Payments submenu visible, and on this page I've added Group which has the subscription information and a button labelled subscribe.
This is not visible by default, and is shown only if the :
Current Users’s Role is Team Admin
These roles I’ve set up as Option in the Data tab, and each User has a role. I’ll describe this in more detail in a future article.
Since I currently have only one plan, I’ve implemented a checkbox which is selected by default, and is disabled.. i.e it’s displayed as the only option. Another approach if I add more plans in the future is to have this as a dropdown control, mark one plan as the default in the database, and auto select this in the dropdown based on the default plan.
The Name of the plan, is selected using this search in the group:
Search for Plans:first item
This makes sense only for SaaS apps that have one plan available, so for adding plans in the future, this could be changed based on the Default Plan
This button needs to trigger an action, so add a Workflow with these 2 steps:
Payment | Subscribe the user to a plan
The value for Stripe plan name will be populated for you as part of the Stripe plugin. It fetches the plans defined in your stripe account. Doc ref here. Important: This will vary depending on your test Stripe plan or your Live Stripe plan. For simplicity, just have the test value in there for testing, then change it when you go live. If you need to manually type in this value, it is available in your Stripe account under Products | your product | Pricing | API ID
The second workflow action is all about updating our local User in our Bubble database, to reflect the new status.. that they have a plan, some info about payment dates & recording their new Stripe Subscription id.
Want access to more articles like this?
Did you know that some of my posts are published for paid members only? Access all past and future exclusive content by subscribing:
Clicking Subscribe will display this nice looking page that you didn’t have to code…
I’ve filled in the card info in the screenshot above.. you may be wondering about the odd looking credit card information. Stripe know that creators will need to test transactions without actually paying with a real credit card. Go to stripe.com/docs/testing and scroll down to the Basic test card numbers section, which provides a list of test card numbers you can use.
Clicking Subscribe will result in Stripe subscribing this user to this pricing plan, in a manner that will recur every month. Yuss!
If you now check your Stripe console Customer section, you’ll see a new Customer entry has been created and clicking into it shows the log of what the Plugin did for you.
Under the Subscriptions section you’ll see the first of many subscriptions your app will collect, because it is awesome and so are you :)
Enjoy the feeling of your new superpower.
Providing UI Feedback
After the Stripe subscription is completed, the plugin will redirect you back to the url you configured earlier when we set up the Stripe Self Service Portal.
This is probably the same page that you added the Subscribe button to. In my case I have a group that is hidden, until the Current User’s Stripe Subscription Status is not empty
How does this status get updated? We did that already in step 2 of the Workflow. Nice.
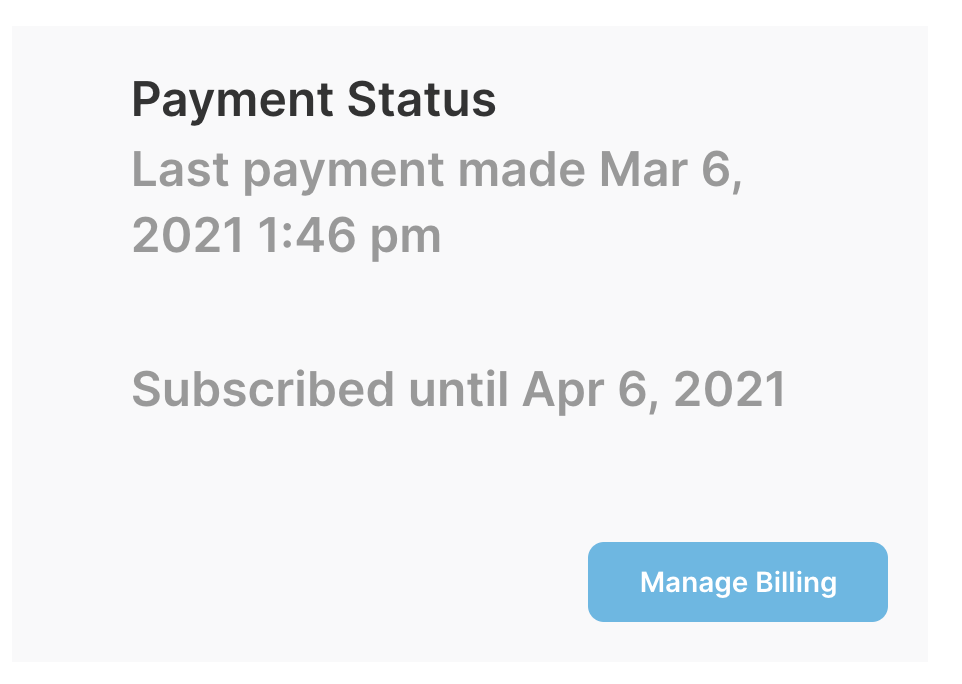
The result is my payment page now has a different group visible which has this content.
So the User gets feedback that their subscription was successful, and they can see when it will renew. Because we set up Stripe to be ‘Monthly’, this will automatically renew, thereby maintaining the customers paid status.
But what is that ‘Manage Billing’ button you ask… read on.
Managing Existing Subscriptions
Customers may want to cancel a subscription, renew a cancelled subscription, or change their billing method. This can be done via the Stripe Self Service Portal which is already installed because we did that earlier.. Go us!
Add an Button, call it Manage Billing, and add a Workflow:
Actions:
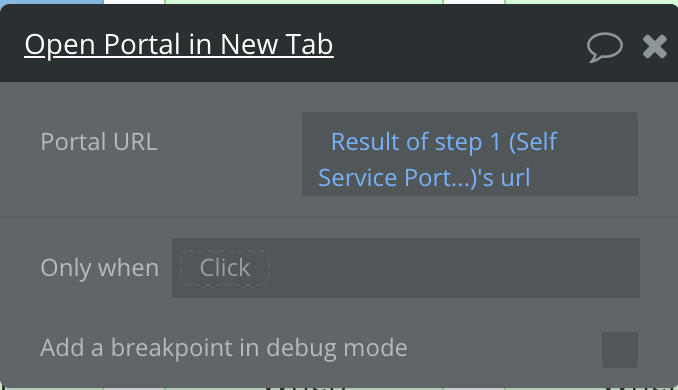
Plugins | Self Service Portal - Stripe Portal
Configure as below. You’ll notice there are several fields that we haven’t added to our User Data type but they are still available to us. This is one of the benefits of the Stripe with Bubble, as some Stripe information is managed for us.
Plugins | Open Portal in New Tab
Now when you click the Manage Billing button, you’ll see the Stripe Self Service Portal, allowing the user to change their own subscription as required. They can cancel an existing plan, renew a cancelled plan, and manage which card is charged.
This updates the settings with Stripe, but… how does your Bubble app know about this, and in particular how does your Bubble database get updated… enter Webhooks.
..like the article so far? consider motivating me with caffeine to write more:
https://www.buymeacoffee.com/MartyLindsay
Webhooks
Over time, some changes can happen Stripe that affect a subscription ( for example failed payments causing the subscription to lapse), so you’ll need to configure Stripe to send the information via a Webhook to Bubble. Bubble will listen for this Webhook via a Backend Workflow API Endpoint. Changes in Stripe can then automatically update the state in your app.
The best way to learn how to set this up is by watching this great video from Billflow.
I plan to write another article about Webhooks but the video above should get you started.
Note: if you decide to validate the IP addresses that Stripe sends from, as an additional security layer, then you can do so. You’ll need to enable the checkbox on your Endpoint labelled ‘Included headers in the detected data’. After this you’ll need to reinitialize, i.e Click the Detect data button, go back to Stripe, add /initialize to the end of the url, Send test webhook, then remove the /initialize from the end of the Stripe url.. Then, go back to Bubble. You’ll now have all the header fields available, including cf-connecting-ip, which contains the IP address Stripe sent from. It should be from this list which you can store in an Option set, to then compare in your worflow. Important.. if you DO include the headers, then ALL the field names change format, so you’ll need to revisit your Actions in workflows.. not a biggie, but double check.
Dev vs Live
One last thing. We have been been setting this up using the Test data section of the Stripe console.
Firstly you should copy your products from test to live. Click on Products, then click a specific Product. At the right there is a button called Copy to live mode.
Pressing this will create a live product with the same attributes as your test product, except it will have a newly generated Price ID.
A note from the Bubble docs:
Important: Since the app has two versions, Development and Live, you need to have both versions of your account in Stripe to have the same plans with the same IDs.
With the ‘View test data’ toggle disabled:
navigate to Products, your specific product, and scroll to the Pricing section. Copy the API ID, which starts with price_
Copy it to the value in your Bubble database, Plan datatype, ‘Stripe Price ID’ field, overwriting it.
NOTE: when your Bubble app is in Development mode (i.e has ../version-test/..) in the url, the Stripe plugin will use your development keys, and expect to find the Products you have created in the test version of your Stripe account, as identified by the price id. Once you deploy your app to live in Bubble, and try to Subscribe, your Live keys will be used, and the Stripe plugin will expect to find the Live version of the product, as identified by its price id. For this reason, many Bubble creators have found issues when managing these differences. Sometimes this error will appear.
Stripe error: no such plan: ‘price_xyz…….’; a similar object exists in live mode, but a test mode key was used to make this request’
What we’ll do is just manage one price id. We’ll test with the test one, get it working, then overwrite it with the live one. A much more elegant solution is to store them both in the database, then select the correct one using a search, based on the apps status, i.e development or live. I may update this article in the future with such a change.
Now, when if you click Subscribe from a user account, it will subscribe the user to the production product.
Disclaimer
The processes listed in this article are the steps I have gone through to get a working recurring subscription up and running. They are not perfect, and with any technical activity, there will be hurdles along the way as environments change. Please let me know of any errors, omissions, or links to related docs, and together we can make this resource even more complete.
Appendix
Below is a list of some additional resources that assisted me in learning more about this topic.
Other Articles
To see more resources about processing payments with Bubble and Stripe, check this category on my site FindNoCode.info.
One Off Payments
If instead of implementing recurring payments you just want to receive a one off payment, this this video from Evan Little will get this done:
Bubble Docs
https://bubble.io/reference#Plugins.stripe
https://manual.bubble.io/core-resources/bubble-made-plugins/stripe
https://bubble.io/reference#API.authentication
https://forum.bubble.io/t/stripe-customer-id-from-bubble-plugin/95072
Stripe docs
https://stripe.com/docs
https://stripe.com/docs/api/events/types
https://stripe.com/docs/keys
https://stripe.com/docs/webhooks/go-live
Twitter References
Thanks to @nocodelife and @zulualphaweb for posting these two tweets which got me started.


Thanks for reading this, I know it was long, but I hope it gets you started on the subscription journey for your app.
Thanks for your time, I really appreciate it.
If you want to know more about Bubble and SaaS then follow me on Twitter


