
How to record metrics about activity within your Bubble app
Let's record what's going on.

There are many tools which record website activity and they are great, and they often come with Free tiers. They are useful for webserver style metrics such as visitor counts, page views, visitor length etc.
It’s also useful though to supplement this with other metrics and reporting based on particular ‘business activities’ that occur in your specific app, i.e ‘create task’, ; ‘invite team member’ ; ‘send reminder’.. etc.
We can do this by recording some of the key customer actions in the bubble database.
Let’s set that up.
This post is brought to you by DocuPotion

DocuPotion is the PDF plugin Bubble devs love to use. It gives you total control over the design of your PDFs and makes creating beautiful PDFs easy.
Want to create simple invoices? DocuPotion can do that.
Tired of dealing with page breaks that don’t work? DocuPotion has detailed page break controls.
Already using a PDF plugin but can’t run it in the backend? DocuPotion allows you to generate PDFs in backend workflows.
Want to generate a detailed 40-page report with graphs and charts that delights your users? No problem - DocuPotion can generate large PDFs without issue
The Database
I’ve set up a new Data type called Metrics, and I’ve added two fields, called Name and Value. The Name field is of type Text, and the Value field is of type number

Note: I’ve set this up to be Publicly visible, as I actually DO want anyone to be able to view this data, as it could be useful in my marketing activities. Since I’m using the Canvas templates, this is implemented via Option Sets | Bubble Pages | Metrics | Modify attributes:

What to record
OK, we are talking here about key types of activity that happen with your app, i.e the business logic itself. In my case there is a clear path that customers need to progress through in order to get the full value, which is:
sign up
create team
invite team member
invitation accepted
task added
roster generated
task completed
reminder sent
So, I’ll want to create records[rows] for each of these items in order to record a counter for each type.
Note: I’m implementing counters only, as the metric types..no gauges, rates, distributions, histograms etc… we can chat about that in another post :)
I create a record for each of these types, under Data | App data | New Entry

and for the value for each, to start with I entered the number 1.
Making it work
So, we want our metric data to automagically increment the counter when some activity happens in our app. For example, each time a Team Admin adds a Task to the list, I want the ‘Tasks Added’ counter to grow by 1.
To do this, I need to locate the logic within my app which saves a Chore. This is triggered by the Save button on the ‘Pop Add Chore’ element. From there there is a workflow which does the work.

All I need to do now, is add 2 additional tasks which select, then increment the counter.
Task 1:
Add a new action on the end

Choose Data (Things) | Make Changes to a Thing
Thing to change : Search for Metrics:first item
Type: Metric
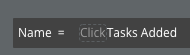
Name = Tasks Added

So.. a few comments about this step.
We are doing a ‘Make Changes to a Thing’ type action here, but actually the first step is just in order to ‘Select the thing’ so we can then reference it in the next step.
We select the ‘first item’ in the search because even though there is ‘only one’ row for each type of metric, we specifically need to tell bubble ‘select the first 1 of the 1 items in this list’ .
When typing the text of ‘Tasks Added’ it can be difficult to make bubble accept this, due to the way bubble has the ‘Click’ control in the field..it won’t accept typed text if you have already selected the ‘Click’ control. I usually type to the right of this field first, then move the cursor to the left of my text, then backspace to remove the ‘Click’ control


Now for the Second action.
Task 2
Here we will do the increment counter part.

Thing to change: Result of the previous step
Value = This Metric’s Value + 1

This step uses the previously selected value, and makes its new value to be one more than it started as.
Tip:
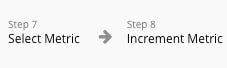
Bubble will name these actions based on their default, but you can rename them as something sensible by clicking on their titles and typing new text.
I chose ‘Select Metric’ and ‘Increment Metric’
Displaying the Metrics
I set up a new page to display the metrics at https://rosterbuddy.app/metrics.
I added a group, then within this added a Repeating Group.
The Repeating Group has a Type of content of ‘Metric’ and the Data source is a ‘Search for Metrics’

Note: In almost all other searches in my app, the data is tenant specific, i.e my searches ALWAYS include ‘Team = Current Users TeamId’, but in this case, this is Global data, across all customers. I’ll consider adding different metrics later on if I want to surface ‘per team’ reporting for each team administrator.
I want to display each unique metric type within each cell of this repeating group, so I’ve put a group into each cell, where the type of content is ‘Metric’ and the Data source is ‘Current cell’s Metric’

So now all I need is two text elements, one for the Name and one for the Value:
Name:

Value:

And that’s it. I repeated a similar setup for various other actions within my app, mapping to the relevant Metric name using the Search criteria: for example:

I added some styling, and the results look like this:

These metrics will update as customers perform actions within your app, and no further work is required on your part. It also is one less reason for you spend time looking at your database in the bubble console, which is also good practice.. i.e removing toil, and reducing risk.
Some other thoughts
If you find yourself creating multiple similar actions in different places in your app, it’s probably worth considering setting up a Backend Workflow. This requires a paid Bubble plan. The idea is that you consolidate the actions in this one place, and you just pass in the data that matters, which in this case is the metric name. Let me know if you’d like an article on setting that up.
Thanks
Thanks for reading along, I hope that was helpful. This article was FREE as many of them are. Some articles are for paid subscribers only so if you want to also access all past and future paid articles please subscribe.
Regards.. Marty