
How to use data from one API call, to configure the next API call in Bubble
As your app gets more complex, you'll want to make additional API calls based on data you've already received. Here is how to set that up using the TheCatAPI

Hi there. If your app idea is going to perform some ‘useful work’ for your customer, then it is likely to involve a certain degree of complexity. This is a good thing, because the more complexity you can hide from the customer, the easier it will be for them to feel that your product provides them value.
It is likely then that your app will make use of external data sources, and that you’ll interact with them using the interfaces of those resources, which is commonly a REST API.
Bubbles general purpose API Connector allows you to easily integrate with these interfaces.
What this article will describe is how to do an initial call to get a list of values, populate this into a dropdown, which will be the basis of the next API call.
..plus you get cat pictures

This post is brought to you by DocuPotion

DocuPotion is the PDF plugin Bubble devs love to use. It gives you total control over the design of your PDFs and makes creating beautiful PDFs easy.
Want to create simple invoices? DocuPotion can do that.
Tired of dealing with page breaks that don’t work? DocuPotion has detailed page break controls.
Already using a PDF plugin but can’t run it in the backend? DocuPotion allows you to generate PDFs in backend workflows.
Want to generate a detailed 40-page report with graphs and charts that delights your users? No problem - DocuPotion can generate large PDFs without issue
The API
The API we’ll be using is https://thecatapi.com/ . (If you are more of a dog person, there is a very similar API at https://thedogapi.com/ that you could use instead.)
This API is free to use for our purpose, only requires a simple authentication process, and can return useful data based on a few parameters.
First Sign up so you can get an API Key


You’ll then be emailed you API which we’ll be using shortly in the API connector.

Make a note of this in your password store, and never share it publicly.
If you want more information about the authentication process of this api, the docs are here: https://docs.thecatapi.com/authentication
Setup the API Connection
In your Bubble app browse to:
Plugins | API Connector
and click Add another API
Give it a name, like ‘The Cat API’ and the Authentication type we want is ‘Private key in header’
A note about headers and url parameters.
In https requests, the header is encrypted, which means that if you have any sensitive parameters you want to send to a remote web service, you should put them in the header rather than in the url.
The url (and its parameters) however is visible in plain text every step of the way and could be intercepted and read by a malicious actor, and/or potentially logged in plain text by any number of systems [routers and servers] that it passes through.
so.. if in doubt, put any authorization keys in the header, not the url.

For configuring this in our API connector, we’ll simply add it as a key name just below the API name

Instead of 12345, add the api key you received after you signed up to thecatapi.
The API Calls
We want 2 API calls. One to get a list of breeds, and another to get an image of the selected breed.
For the first call, we look at the docs https://docs.thecatapi.com/api-reference/breeds/breeds-list . At the bottom of this page is a tool which displays the url we need:
https://api.thecatapi.com/v1/breeds
so, we’ll configure our first API call like this:

Let’s jump over to the UI set up for a bit:
The UI
I have a simple structure like this
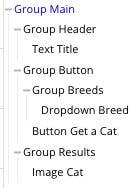
Which looks like this

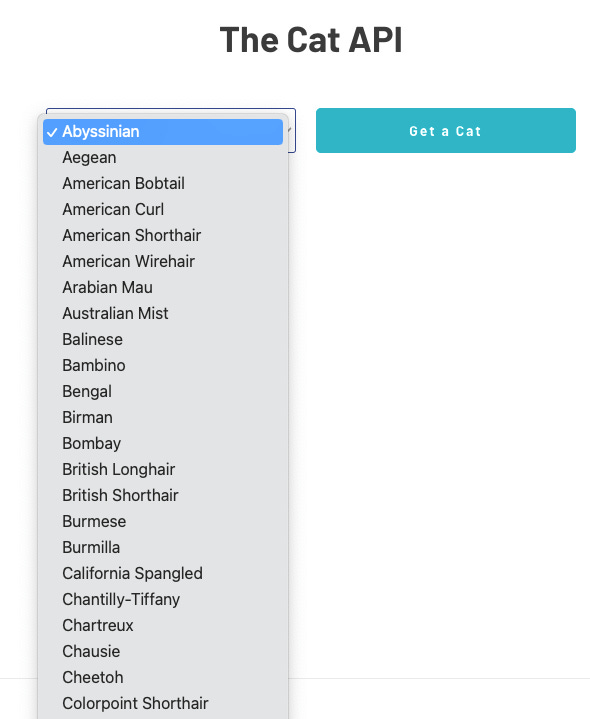
The magic bit is that you can configure the list of options for a dropdown to be the results of an API call. This is just what we need, so when the page is loaded, the API call is triggered, the list of breeds is returned from thecatapi and our dropdown now has a list of breed names to choose from.
Configuration is like this:

Importantly it is the ‘name’ attribute of the breed that we display in the dropdown, even though later for our second API call, we use the id attribute.
The UI results look like this:
The Second API call
Now that we have a list of cat breeds to show the user, they can select one, and click the button to get an image of a cat of that breed.
For this we need to make another API call.
Within your existing The Cat API section, click

Configure it like this:
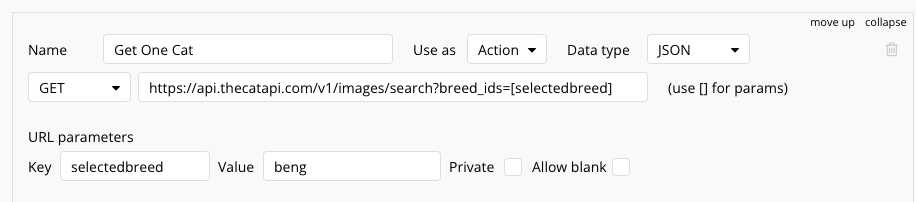
The text in the image is here:
https://api.thecatapi.com/v1/images/search?breed_ids=[selectedbreed]
Notes:
the [selectedbreed] value is just a placeholder, which will be populated at run time with the selected value from the dropdown
the beng value is to have a valid field in there, so that when we click Initialize call, the remote API will be able to return actual data from the cat type beng. At run time it will become the value from the dropdown.
The Use as field is set as an Action rather than Data. This is so we can select it in the Workflow later in this article.
Click Initialize call
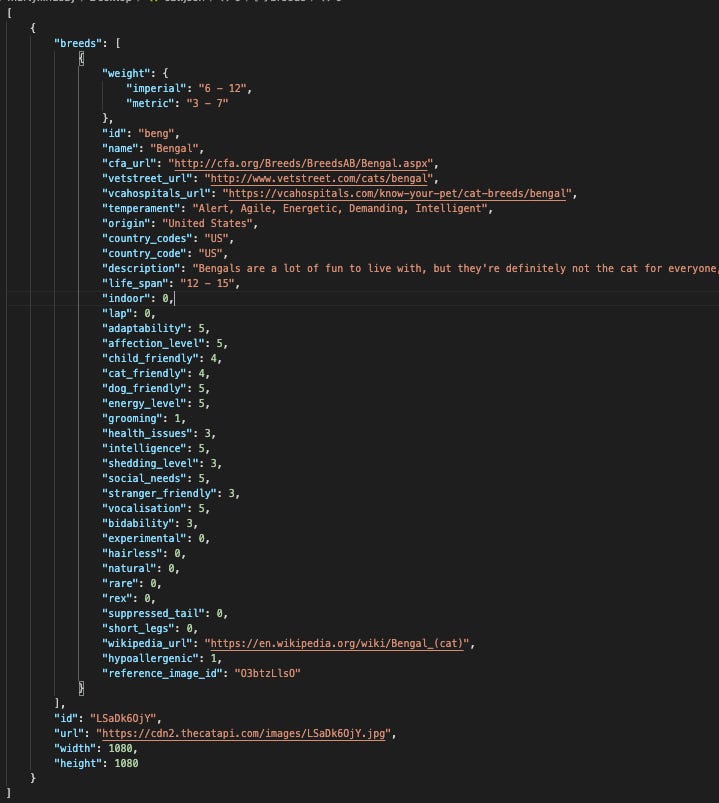
The results will be shown, which gives you an idea of the data you’ll have available to use in your app, plus the datatypes of these fields.

You can optionally show the raw json data too.
Click SAVE, then head back to the UI.
UI part 2
We want the button to trigger the second API call based on the selected item in the dropdown.
Click the button and then Start/Edit Workflow
There are two actions.. one to get the data, and another to send it to a Group in the UI.
Start typing the name of your Action then select it.
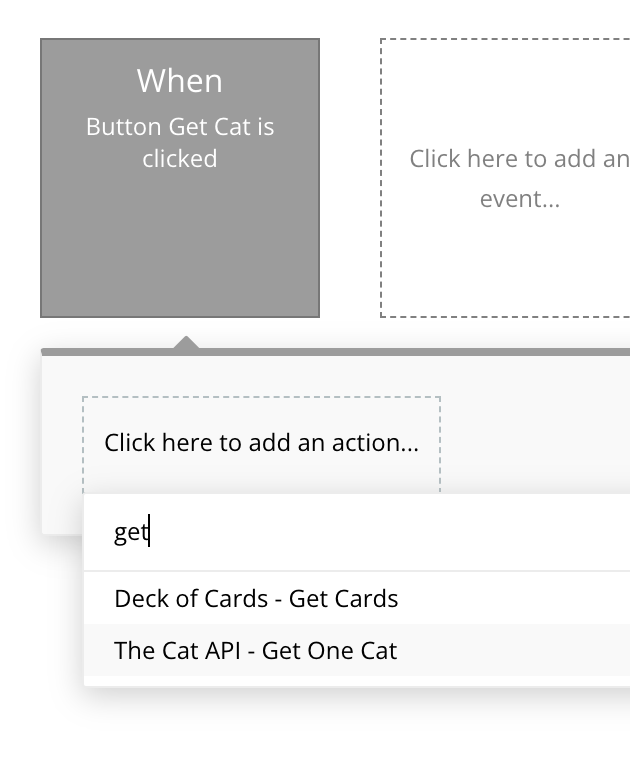
[ Alternatively you can find it under plugins]

Now, since we added a parameter in square brackets in our API setup, this is now shown in the Action configuration screen:

So all we need to do is reference the Dropdown Breed’s value’s id
This will then go off to TheCatApi for a second trip, and request an image for this selected breed.
But, how do we get this data into the Image Element on the page?
We have our second action to Display Data
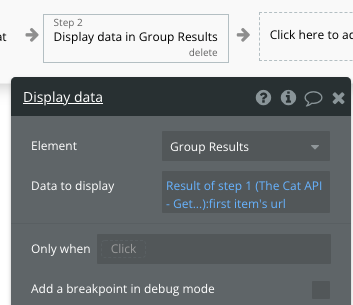
Specifically we are referencing the url attribute of the first item in the list [ which is a list of 1 item]
And because our Image element is within this group, and is configured to display its Parents Group Text, then the url of the image is made available to it.

Job Done.
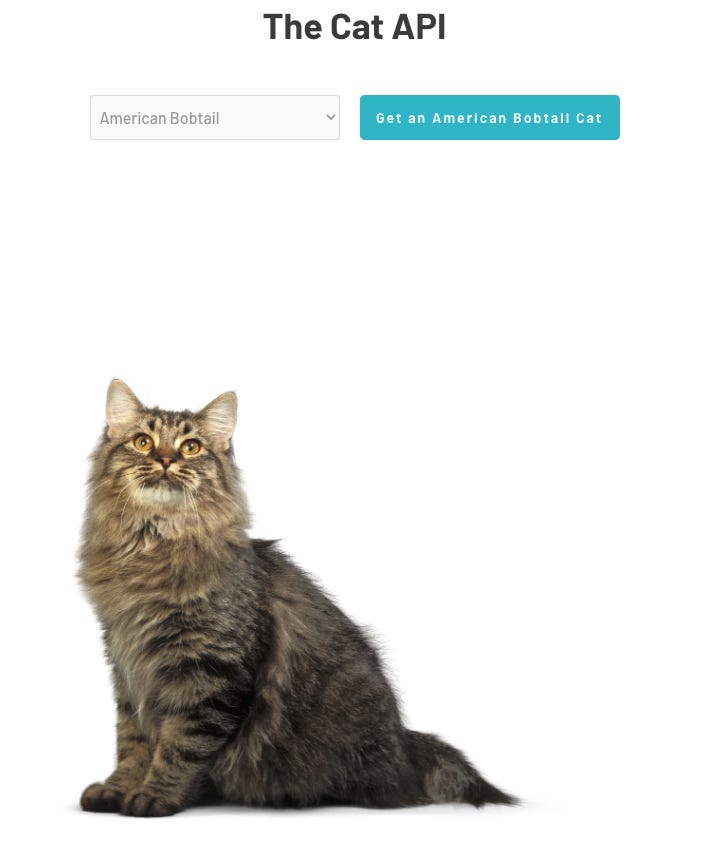
The sample app is available at https://api-samples.bubbleapps.io/version-test/cat and looks like this:
Thanks for following along, and I hope that helped you in your API journey.
For other Bubble tips you can find me on twitter @MartyLindsay_NZ
For more resources about using the API Connector in Bubble, check my site FindNoCode.info.