
How to enable Social Login using Google, in your Bubble app
Make it easy for your customers to login in your Bubble app, using their existing Google account.

Hi there,
I’m going to set up Social Login using Google for my house chore roster site, and I’ll write it up in this article, so that if you want to do something similar, you can get there quicker. Note, if you want to set up login using Twitter, see my article here
Why?
People are tired of managing passwords. I know I am. I have a password management system which works well, but sometimes I just want to click Login with Google, and not think too much more about it. Of course, every bit of convenience is trading away a little privacy, but most people are used to this trade off by now, and not having to think of a password is a little bit less friction in your new customer sign up flow.
OK, lets get into it.
This post is brought to you by DocuPotion

DocuPotion is the PDF plugin Bubble devs love to use. It gives you total control over the design of your PDFs and makes creating beautiful PDFs easy.
Want to create simple invoices? DocuPotion can do that.
Tired of dealing with page breaks that don’t work? DocuPotion has detailed page break controls.
Already using a PDF plugin but can’t run it in the backend? DocuPotion allows you to generate PDFs in backend workflows.
Want to generate a detailed 40-page report with graphs and charts that delights your users? No problem - DocuPotion can generate large PDFs without issue
Prerequisites
A Bubble app
A Google account
The Docs
I’m using the Canvas templates from Airdev, which I’ve chosen to make it easier to quickly release a nice looking app, with a decent chance that it will also be responsive. This article will show you many canvas specific steps, but I’m confident that it will still be useful if you aren’t using Canvas. The main parts are just a Button, and some Google config.
The Canvas docs are here https://docs.airdev.co/canvas/ and at the top right is a search box, into which I typed : Social
This resulted in this:

which links to https://docs.airdev.co/canvas/canvas-functionality/reference/reusable-elements/signup-login so lets work through that. It looks like there is a reusable popup element in the header, which makes sense because you want to login/out from any page.
Locating this in my bubble app

The popup comes pre loaded with several Social Login buttons, but within a group that is hidden by default. This means that by default, the a new customer will be required to type in their email address plus a password of their choosing.

This works fine as is, due to all the workflow items you get for free when you use canvas templates.. you can see why I like them. I’m all about saving as much time as possible in getting to launch day.
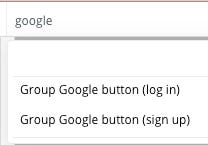
What I’ll do next is locate the google button and unhide it. A search for ‘google’ in the top left search field locates it and I want the (sign up) version to start with & we’ll get to the login one later
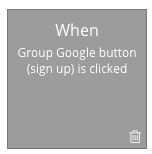
The button (Group Google button (sign up) is already visible by default, so we’ll check the parent folder.. yep, it’s Group other buttons (sign up) that we need to show:

Also check the other items in this group, to make sure they are hidden.. we are focusing on google for now.

So running your app now and choosing signup from the login page you’ll now see the google button displayed.. yay

Looking at the Worklow, there are no actions, so it looks like we’ll need to set that up:
The Canvas docs don’t show us how to do this, so the rest of this document will explain how to do it.
The Plugin
Lets see if there is a plugin for Google.
Plugins | Google
There are many, but lets start simple, and install the once called ‘Google’ that was created by Bubble. The docs for this are here https://developers.google.com/identity/protocols/oauth2
So, what is the oauth2 thing?
“OAuth is an open standard for access delegation, commonly used as a way for Internet users to grant websites or applications access to their information on other websites but without giving them the passwords”
That’s all we really need to know at this point. A new customer will click on the Login with Google button, and bubble will just ask Google ‘is this person who they say they are”, and Google will be like “ yep, it checks out”, and then Bubble is like: “thanks, I’ll let them login to this application, and also create a user account for them in my database”
And your user is now all signed up to your app, and no user passwords were handed around anywhere. Also you know the customers email address, which is super handy for keeping in touch with them. Make sure to check out my other article about How to enable Email Notifications for the users of your Bubble app
OK, back to the plugin: You’ll see that it wants some API keys
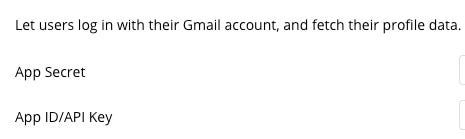
These keys you’ll need to generate as part of your Google account, and they will allow Bubble to authenticate with Google services on your behalf. This might be your own personal google account, or a specific one you have set up for your various side projects.
According to the Google docs here we need to go to the Google API Console to create the API keys we’ll use for this app [ and yes, you should set up API keys on a ‘per-app’ basis, as you want the option to change (roll) keys in the future for one app, without having to change the config for all your apps.)
The Google Console
So, login to https://console.developers.google.com/ with your chosen google account.
Note: [skip ahead to the 1: OAuth consent screen section for help on which google account to choose]
If you haven’t been to this console before, then go through their setup wizard, making a note of the terms and conditions. (Seriously.. open the terms and conditions and either read them all now, or save them for reading soon. Google is famous for disabling accounts for the breaches of the smallest of technicalities, so be familiar with their terms of use.)
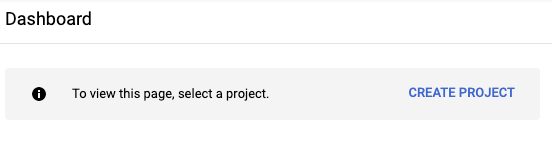
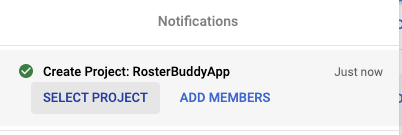
Next click Create Project
Name it sensibly, i.e your app name.
Chose from the Organization and Location dropdowns depending on whether your google account is part of a Google organization or not.
Click Create
Once the project is created, click on SELECT PROJECT
You now have a Project in the Google Console in which we’ll do the next steps:
Domain verification
You’ve gone to the trouble to buy a domain, now we’ll prove to Google that we own it. This part is probably optional, but will be required later if you Verify your app.
Select APIs & Services | Domain verification
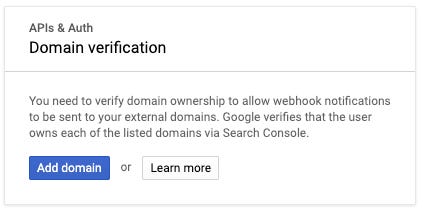
Click Add Domain
On the next screen it mentions the Google Search Console, so first lets head over there and make sure our domain has been added.
[Note I’ve previously already added my domain in the console so I don’t have all the set up steps to note here, just follow their prompts & wizard to add your domain. From memory it requires adding a record to your dns provider which google then checks and then marks your domain as verified in the search console]
Right, back to console.cloud.google.com
Type in your domain name and click ADD DOMAIN
This should add the domain to the list of available domains in the Domain verification page.
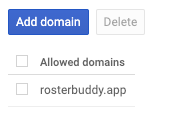
Note: Ignore the disabled checkbox, that is only for selecting domains for which you want to use the Delete button.
OAuth consent screen
From the menu APIs & Services select OAuth consent screen
Select the radiobox labelled External, and click Create
This triggers a wizard, so buckle up.
1: OAuth consent screen
Fill out the App name support email, and upload a logo. These items will appear to a customer when the first signup to your app using Google, and they help to convey trust that your app is legitimate. Make your logo a nice one in the ratio 120:120.
Note: The support email field is a drop down, not a free form field. This means that you can only select emails that are associated with the google account your logged in as. This means that the support email address might be a generic account like support@mycoolcompany.com rather that support@mynewapp.app . This is probably ok, as you likely want to consolidate support emails for your various products. If you really want branding consistency, then you can consider signing up to Google Workspace using your new domain name, then start this process over, but by logging in to google using your app-specific domain name address. The downside is that a Workspace costs approx $6USD per month.
Fill in the links to your app, the privacy policy, and the terms of service.
Authorized domains
Click the ADD DOMAIN button to add your domain, type in the name of your domain in the inputbox, and then click outside the inputbox to save. Weird but true.
Fill out the Developer contact information box and click SAVE AND CONTINUE
2: Scopes
Scopes in OAuth are a way of categorizing and limiting what a request can do, i.e they allow specific things, rather than all things.
Which scopes to choose can be complicated, as there are hundreds. If you go to this page https://developers.google.com/identity/protocols/oauth2/scopes#oauth2 and choose Google OAuth2 API, V2 from the right side menu, you see this guide
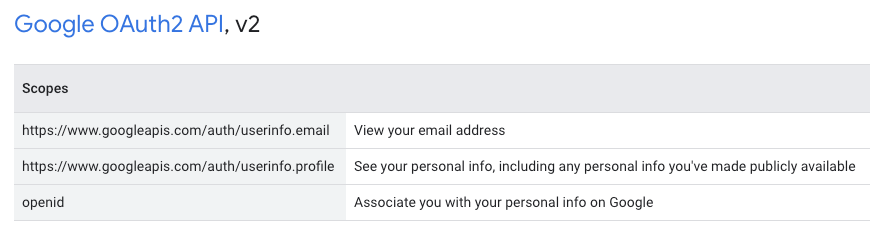
this sounds like the list of scope we need, to perform an OAuth request:
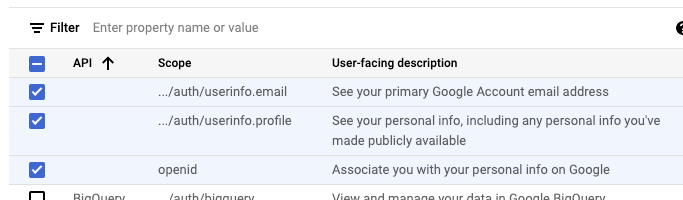
https://www.googleapis.com/auth/userinfo.email
https://www.googleapis.com/auth/userinfo.profile
openid
so lets add these three to the setup wizard
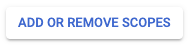
Click ADD OR REMOVE SCOPES
Scroll down to the bottom of the popup, and in the section called Manually add scopes, paste the 3 scopes in
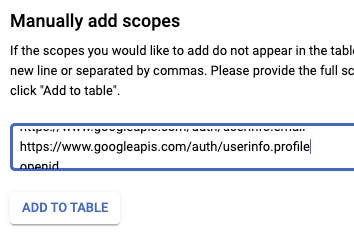
and click ADD TO TABLE
This will then update the popup list with the 3 scopes checkboxes enabled:
Click the UPDATE button

This completes stage 2 of the wizard.. stay with me, we can do it.

Remember, this is one-off pain for you, to make it easier for every one of your customers to sign up. Totally worth it.
Click SAVE AND CONTINUE to go to stage 3
3: Test users
We’ll want to test this setup soon, so lets add a test user. Choose an email address that has an associated google account. If you don’t have this, then jump over to google and sign up as a new user.
Tip: If you use Chrome, then set up a new ‘User’ within Chrome, then login to google as your test user using this new Chrome user. Separating your user accounts/cookies/settings in this way will make your life easier as you test.
Click +ADD USERS, type in the email address for your test user, and click ADD
Now click SAVE AND CONTINUE
Want access to more articles like this?
Did you know that some of my posts are published for paid members only? Access all past and future exclusive content by subscribing:
4: Summary
Yay, the last step isn’t hard, it’s just checking what you configured. Have a look through to make sure it looks ok, then click BACK TO DASHBOARD
So, what have we done?
We have told Google about new domain name; we’ve specified the kinds of data that our Bubble app will be asking Google for as part of the sign up process [ via scopes ], so now we just need to create some API keys which will allow that request to take place.
Remember: this ‘Project’ is currently in Testing mode. Once we have tested we need to remember to come back and click PUBLISH APP in the OAuth consent screen section.
Credentials
In APIs & Services menu on the left, click Credentials
Click +CREATE CREDENTIALS at the top of the screen

We are faced with these options
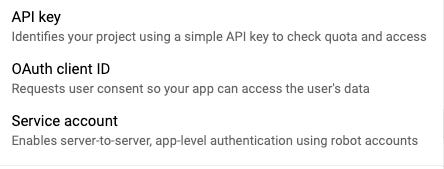
Since we are wanting our Bubble app to act as the coordinator in the login transaction, our app will be asking Google for data about the user[ i.e their email address,profile pic etc], so the middle option is the one for us. This is also confirmed by the docs here which say:
Visit the Google API Console to obtain OAuth 2.0 credentials such as a client ID and client secret
So, select OAuth client ID

We are asked to select an Application type. Select Web application

Choose a name - this can be anything, but make it relevant to your app, and I highly recommend adding the date to it. I can be a real hassle in the future if you need to change [roll] a key, but are unsure which one.
Next is adding Authorized JavaScript origins.
Add the full URI to your domain, in my case https://rosterbuddy.app
Just specify the domain name component here, not any trailing paths.
In Authorized redirect URIs you need to specify the URI that Google will redirect the user back to once the signup process has taken place. You need to copy this value from the Google Plugin in your Bubble app. It is in this kind of format:
https://your-cool-new-app-name/api/1.1/oauth_redirect
and you can find it displayed on the plugin screen after this label:

Unfortunately you can’t copy/paste, so just eyeball it and write it down carefully.
Click CREATE

You’ll see a pop called OAuth client created, and on that screen you’ll be presented with:
Your Client ID
Your Client Secret
Copy both of these now to a password management system. It is common in many API generation screens to never be presented these values again.
So, we finally have the keys we can put in the configuration screen of the Google Plugin in our Bubble app.
Lets head back to the Plugins page of our app
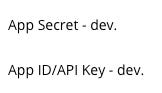
Our options here are basically production or dev.
Although our Google project is currently in testing mode, these keys will stay the same once we hit Publish, so lets put the keys we just generated in both sections of the Google plugin screen:
and the same keys in the dev section:
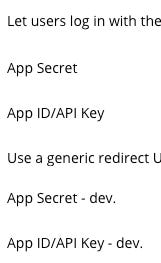
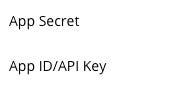
Put the value of the google ‘Your Client Secret`’ into the plugin field “App Secret’
Put the value of the google ‘Your Client ID’ into the plugin field “App ID/API Key’
Ensure you have enabled the checkbox for ‘Use a Generic redirect URL’
Click out of this plugin page to save [i.e click the Design tab]
Status
So, we are all configured now regarding the Plugin>Google connection. Now we just need to wire up that Sign up button to a workflow to make use of it.
Back in the Design tab, locate your Sign Up button. In my case it is within the Reusable: signup/login and the element is a text element, rather than the actual button. Weird I know, but Canvas already has a couple of actions associated with this element, so I’ll extend it. If you aren’t using Canvas then just add an action to a button.
Select the element and click Start/Edit workflow
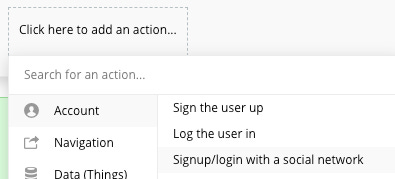
Add an action of Account | Signup/login with a social network
Select Google from the OAuth provider dropdown
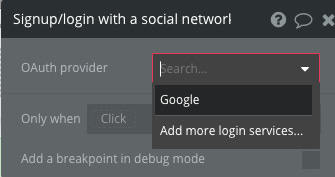
This will be the step where Bubble talks to Google and asks for details about this persons google account, such as their email address.
..like this article so far? please consider sharing it:
Testing
That’s it. Lets test it from the Customer point of view:
Start up a browser, and login to Google using the test account you specified earlier. Then browse to your application and locate the sign up button.
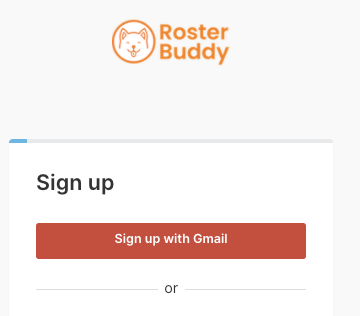
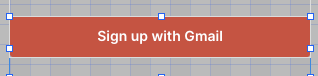
Click that Sign up with Gmail button
You’ll now be redirected to a Google page, where you need to approve that this Bubble App is is allowed to Sign In, using your Google Account. If you have several google accounts, they may all be listed. Select the account you want to allow.

You will now be redirected back to your app and you will be logged in with a valid user account. The plugin takes care of creating the account in the User datatype of your Bubble database.
There is on more thing, for users who later come back to your app, they don’t need to sign up with Google, they just need to Sign in with Google. For this step we just add another button [or use the Canvas provided one]:

[Note: the default canvas text mentions Gmail.. I think I’ll change this to Google, as the OAuth config doesn’t relate to one particular Gmail service, it relates to the OAuth service that Google provides]
Anyhoo, the action for this button is strangely the exact same action as for signup:
Add an action of Account | Signup/login with a social network
Presumably the Plugin is smart enough to detect if a user already exists, then does either of a login or signup action as needed. Nice :)
So, that’s it. Thanks for following along, I know it was a bit of a long process, but Security is the enemy of Convenience. Be happy that you jumped through these hoops, so that each and every new user of your app had an easier time signing up. Every time we reduce hurdles for them, we increase our chances of apps success.
Some Extra Steps
There are some extra work I plan to do, which may end up as articles:
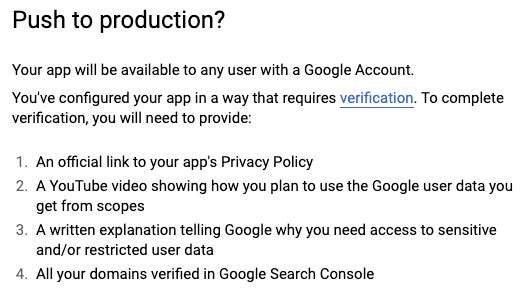
Working out what the relevance is of the ‘Publishing status’ field within this url https://console.cloud.google.com/apis/credentials/consent. It seems that users can login already to my app, but on that google page, pressing PUBLISH APP makes this appear which seems quite a lot:

Given that the number of test users is limited to 100, this may be a requirement soon. More info here. The info however on that site is at odds with the verification requirement, as this mentions unverified apps are ones that requests ‘sensitive or restricted OAuth scopes’.. which we aren’t. Also, it says verification is not required for OAuth-based plugins, which is what we are using [ the Google plugin in Bubble]. Anyone with definitive answers on this topic please let me know in the comments.
“Deciding if I’ll leave the default Bubble signup method visible, or if I’ll go with Social Logins only.
Creating a new invitation workflow to accomodate the Social login process, as invitation confirmations can skip the set password step.
Whether to add more Social Login providers, i.e Twitter, Facebook etc. It makes sense to not limit my customer base
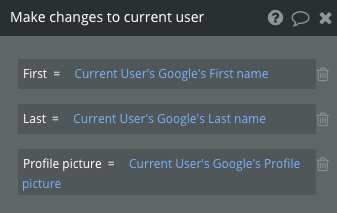
Note: you can also make these changes to the user record as part of the Google sign up step:

Thanks for your time, I really appreciate it. If you want to know more about Bubble and SaaS then follow me on Twitter
..Marty
References:
Some great videos from Evan Little, one of my favourite Bubble teachers.
Sign up with Facebook
Google Login
[Note, the UI at the google end seems to have changed a lot since this video was recorded, but it’s still a great overview of the logic steps involved]